
ZBrush Process
As I have mentioned before, I am sculpting my character and posing in Zbrush, 85% of the production will be in ZBrush. In this section, I will go over how I get to the finished product and my opinion on it. It will consist of images, videos, and renders, along with descriptions on the process.
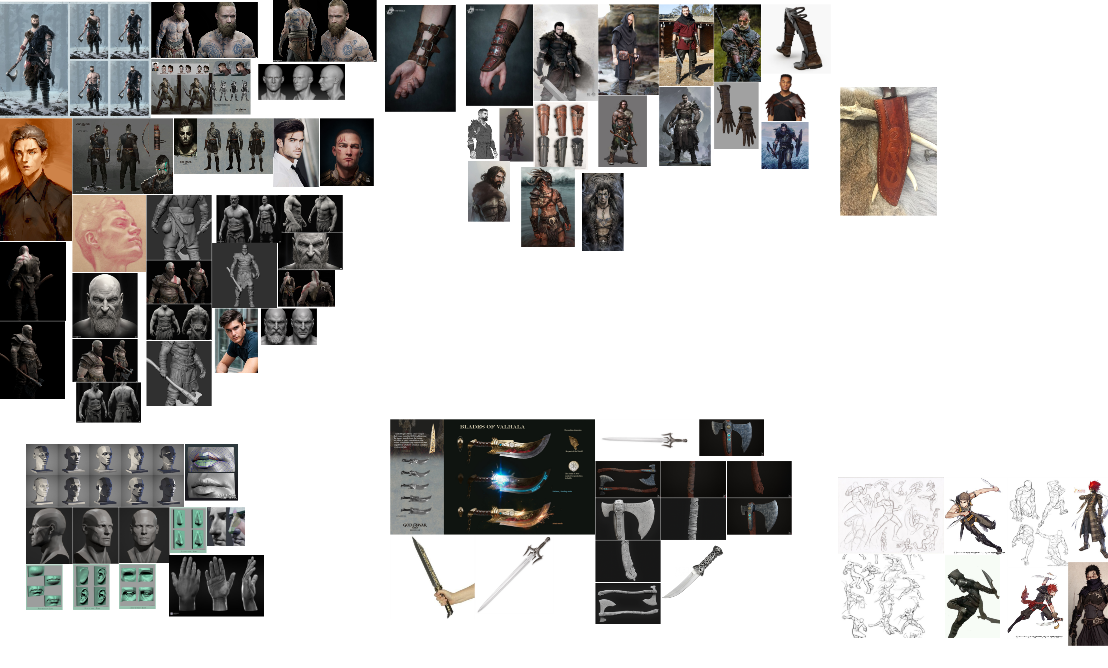
Now, we begin by gathering the references and inspirations of the design, including my concept art. I Use a software called PureRef. It helps me gather all of my images together into one document. All I have to do is drag and drop images from the internet into the program and arrange them for references. The images below are the canvases I made in PureRef. The references are from people on Artstation and Pinterest.
Understanding Anatomy
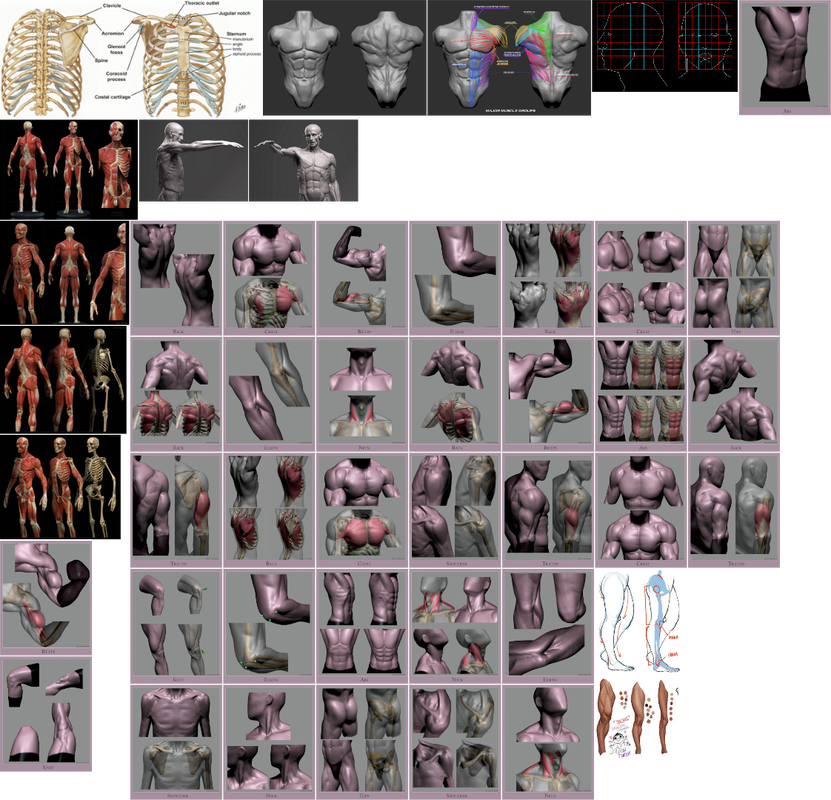
During the Summer, I studied anatomy and researched how the human body looks and moves. I knew that it would be crucial to researched anatomy when It comes to design and proportions. If I hadn't studied them, my characters would be a complete mess and would not be appealing. Once I felt comfortable, I practised them and kept track of my progress. I always study anatomy because there's a lot of individual variation with muscle, fat and skin on people.
I study the skull a lot and tend to sculpt them more than anything else because it is the base of every human face and it needs to be done well for the head looks right. I've spent so much time researching, sculpting and drawing anatomy. I now have a basic understanding of the human body. I utilise that when I make characters and have built a workflow that makes me comfortable when I sculpt.
I study the skull a lot and tend to sculpt them more than anything else because it is the base of every human face and it needs to be done well for the head looks right. I've spent so much time researching, sculpting and drawing anatomy. I now have a basic understanding of the human body. I utilise that when I make characters and have built a workflow that makes me comfortable when I sculpt.
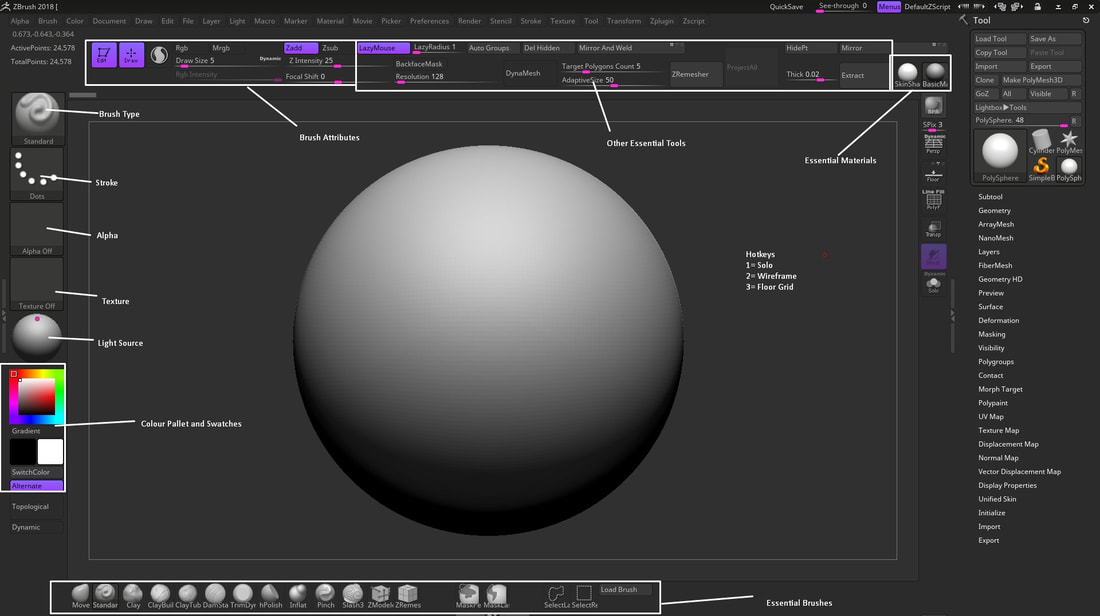
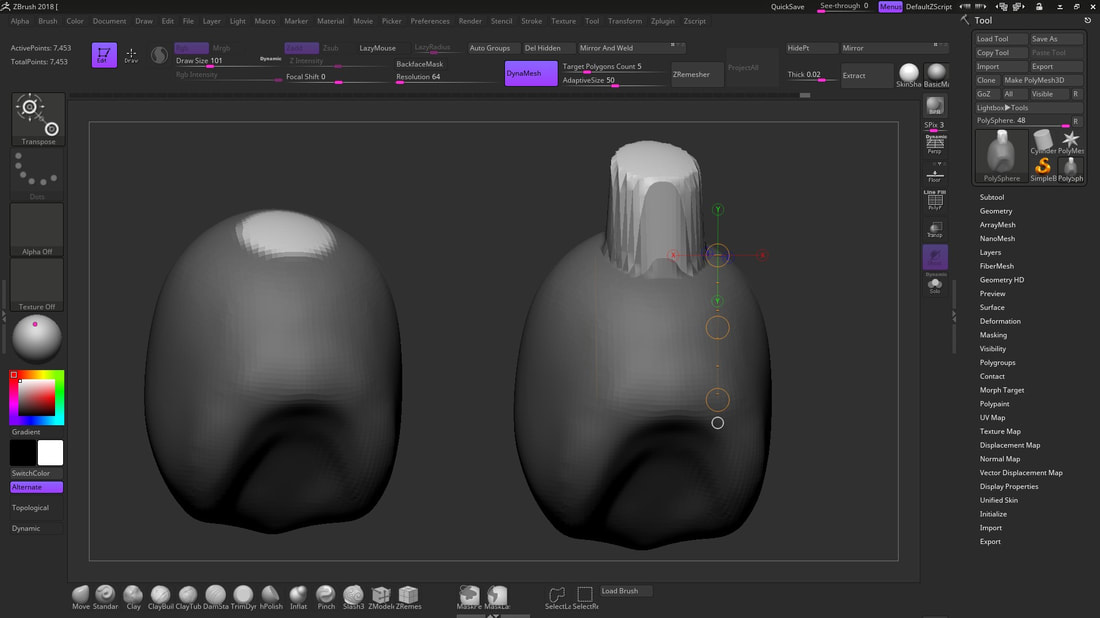
Here is a picture of my Zbrush Setup:
Blockout Phase
This is a quick example of how to block out a generic male body. I made this separately from the actual character because I have no history of the files and lost progress due to technical issues. I decided to remake a full body to show how I get to a solid base mesh for characters and make sure you understand what the process of character modelling is.
Upper Body
 PolySphere
At the beginning of any character sculpting, I always start with a poly sphere and set the Material to Basic Material. I can use the light feature in Zbrush to establish different light setups throughout the sculpting process. I Dynamesh with 64 resolution to begin the block out phase, The main brushes I use are, Move, Clay, Dam Standard, Mask and Smooth. That's is all I need for blocking out the body.
My first step is to establish the ribcage. Most artists like to start sculpting the head, but I feel more comfortable building the ribcage and stem everything from it. Once I'm happy with the body, I masked the neck area and use transpose lines to extrude the neck outwards, like so:
My first step is to establish the ribcage. Most artists like to start sculpting the head, but I feel more comfortable building the ribcage and stem everything from it. Once I'm happy with the body, I masked the neck area and use transpose lines to extrude the neck outwards, like so:
 Building a simple Ribcage in Zbrush
I continue to build the body and add placements for the large muscle groups. It's good to establish large muscle groups first. It's vital to pay attention to the silhouette, or the model won't look right and doesn't give your character caricature.
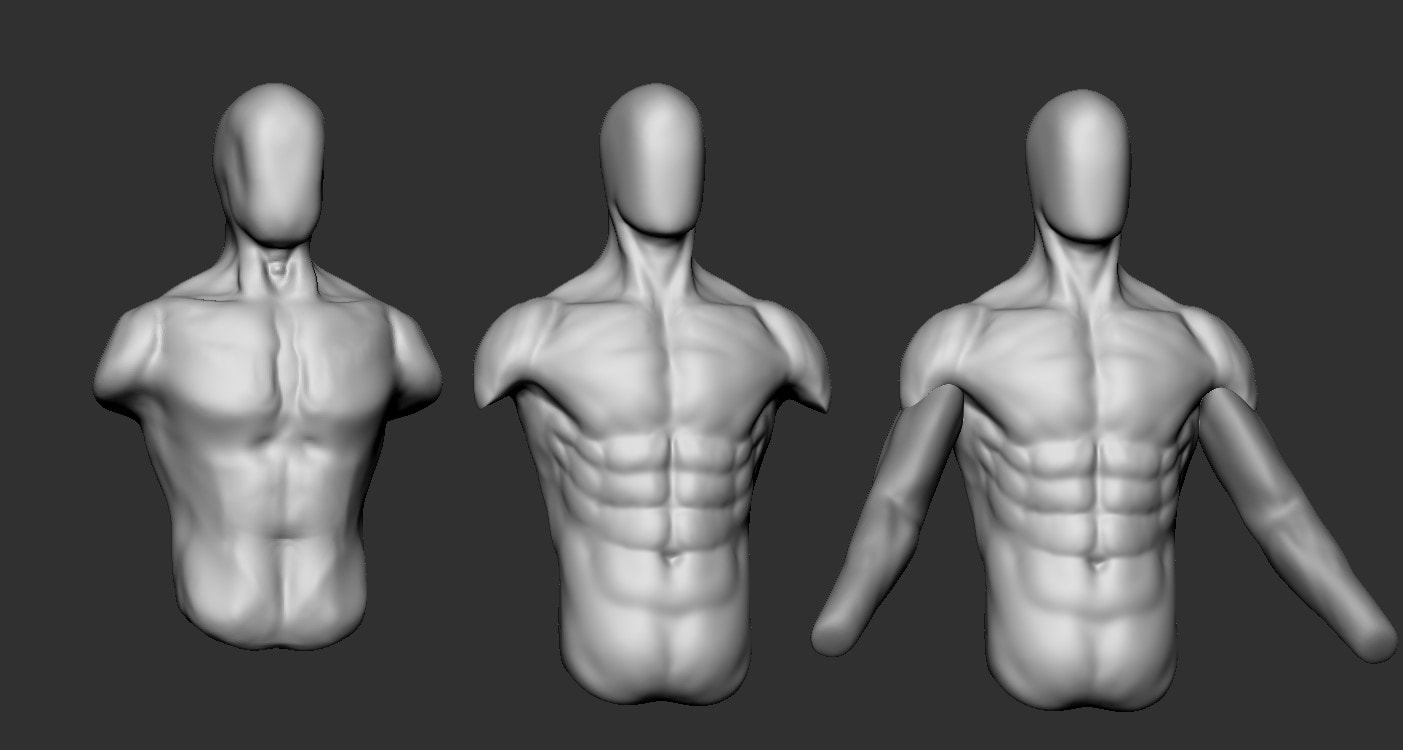 A rough blockout of the male torso
Once I have the body set up, I add the arms and add more muscle definition, to show the large landmarks and get a solid base for the refinement stage. I sculpt a simple head as a placeholder. I don't feel comfortable sculpting the body if there is no head. It helps me understand the anatomy and how the whole body will look. The head also helps me with the proportions.
For the abdominal region, I used clay buildup with alpha 06, to build the volume. I used dam standard to carve in the muscle insertions. Doing this makes it pop out more and show the definition. Váli is a muscular person, which meant I had to show the muscle groups early because I can use them as a base later on when I start to design him.
The arms are easy to make. I masked a circle shape underneath the shoulder, extracted the mesh from that mask, then extruded two cylinders out of it, one for the upper arm and one for the forearm. I then shaped them to look like a simple arm.
Lower Body
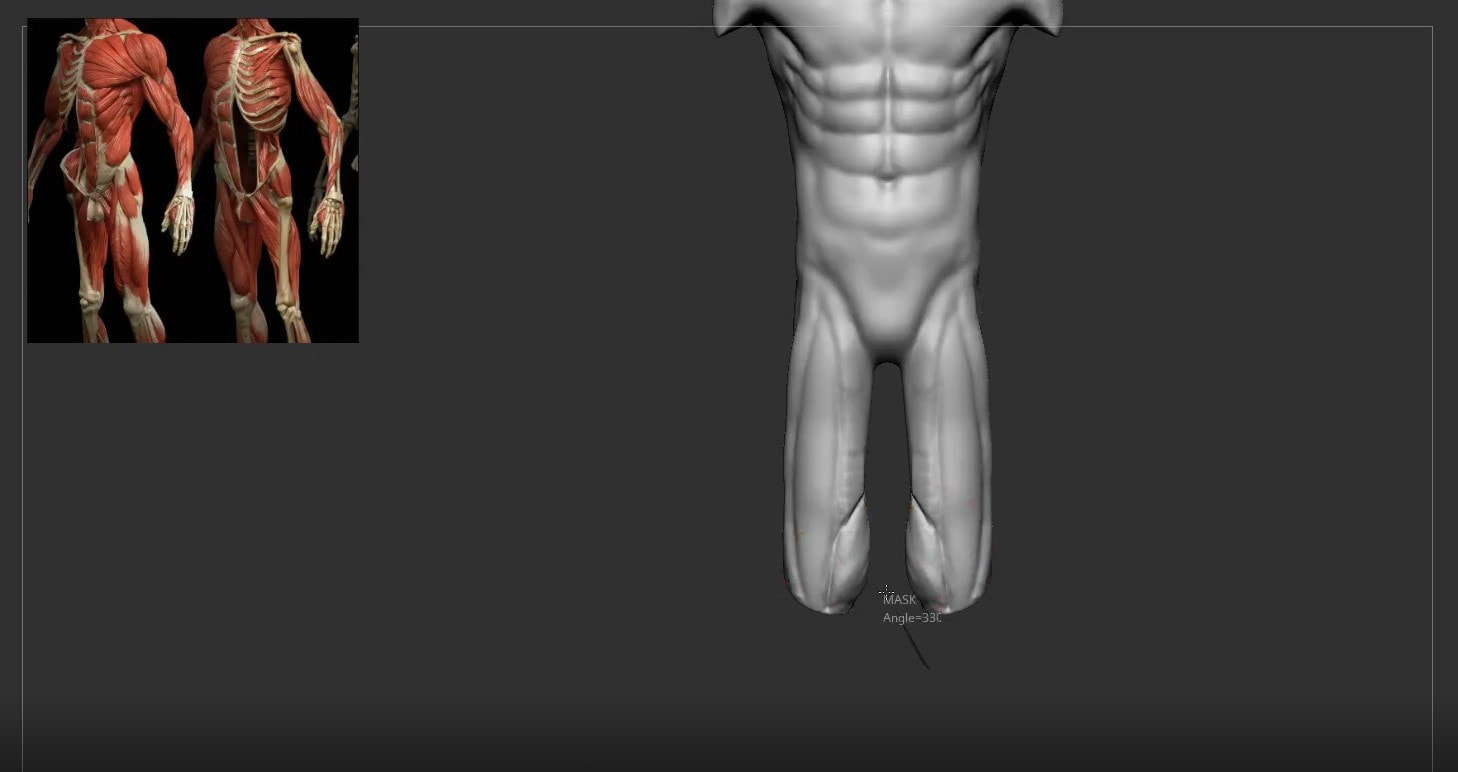
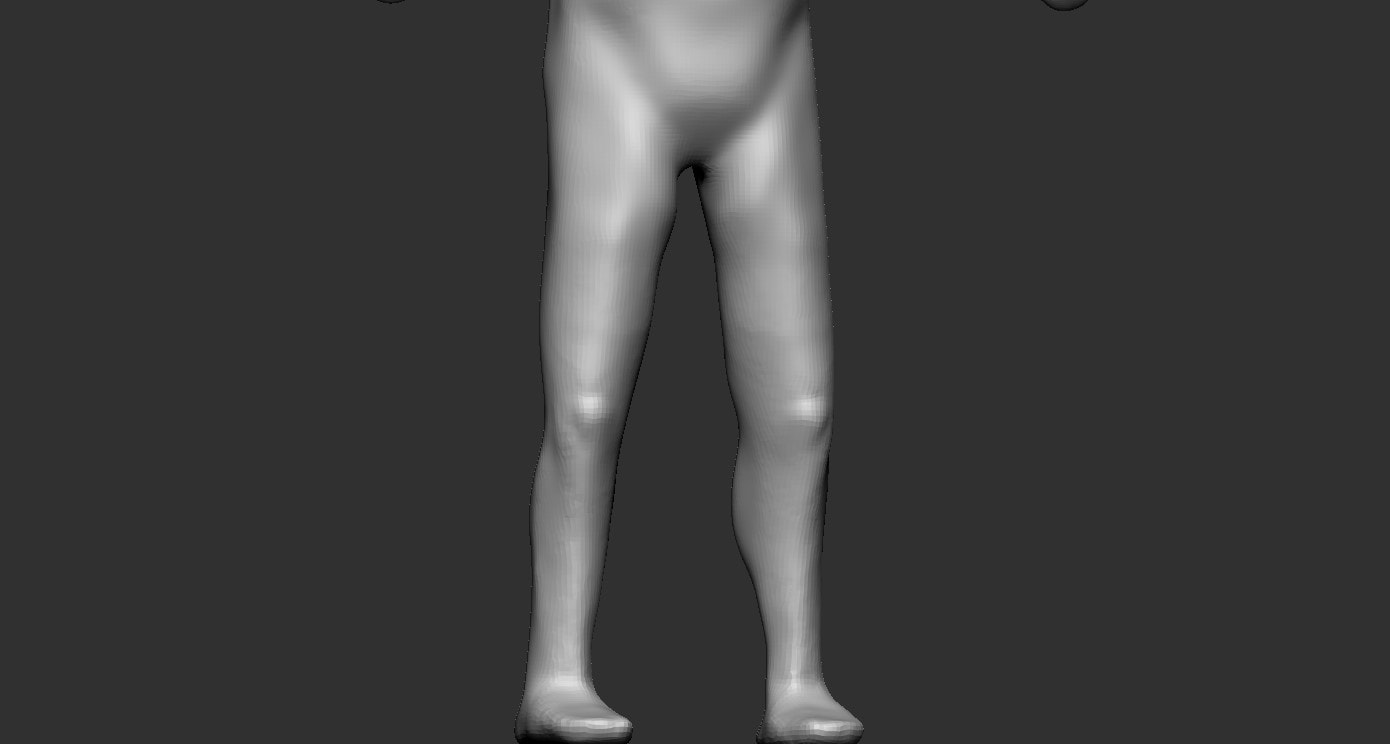
Now the next stage of the block out is to add the legs. Legs are easy to do. Now that I had the upper body done, all I had to do was mask two circles on the waist, invert the mask and extrude the thighs. I rough out the muscle outline and slowly build the silhouette of the leg muscle. After that, I did the same process to make the calves and feet.
All it is after that is refining and building the leg shape, adding muscle and building volume. Once that is done, I make sure that the legs are in proportion to the whole body and make adjustments. My character will be wearing boots, so I won't need to sculpt feet. It's a good idea to get the general shape though, to use as a base mesh for extracting. There's no reason to make highly detailed feet if they're not going to be seen.
All it is after that is refining and building the leg shape, adding muscle and building volume. Once that is done, I make sure that the legs are in proportion to the whole body and make adjustments. My character will be wearing boots, so I won't need to sculpt feet. It's a good idea to get the general shape though, to use as a base mesh for extracting. There's no reason to make highly detailed feet if they're not going to be seen.
Legs extruded through a mask
|
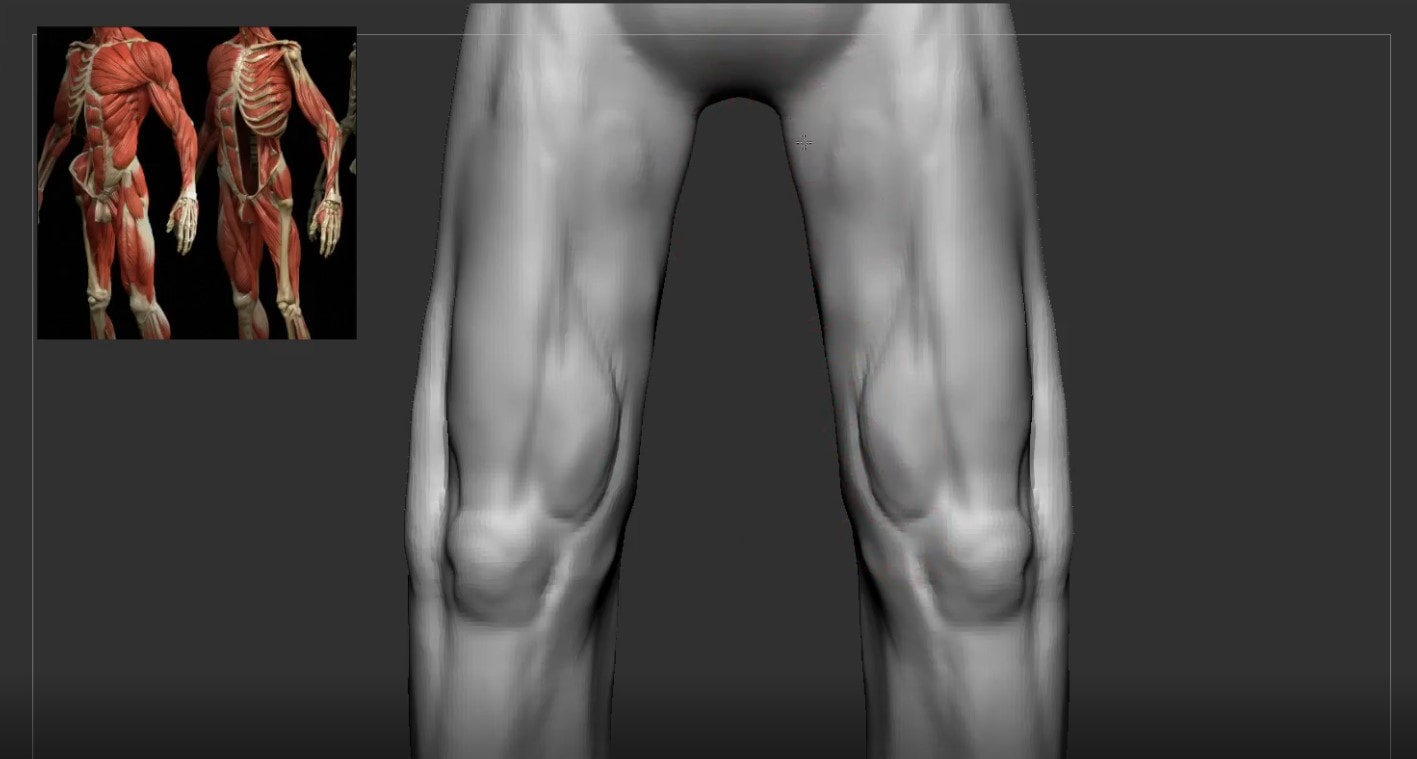
Quad Muscle Refinement 01
|
Calf Muscle Blockout 01
|
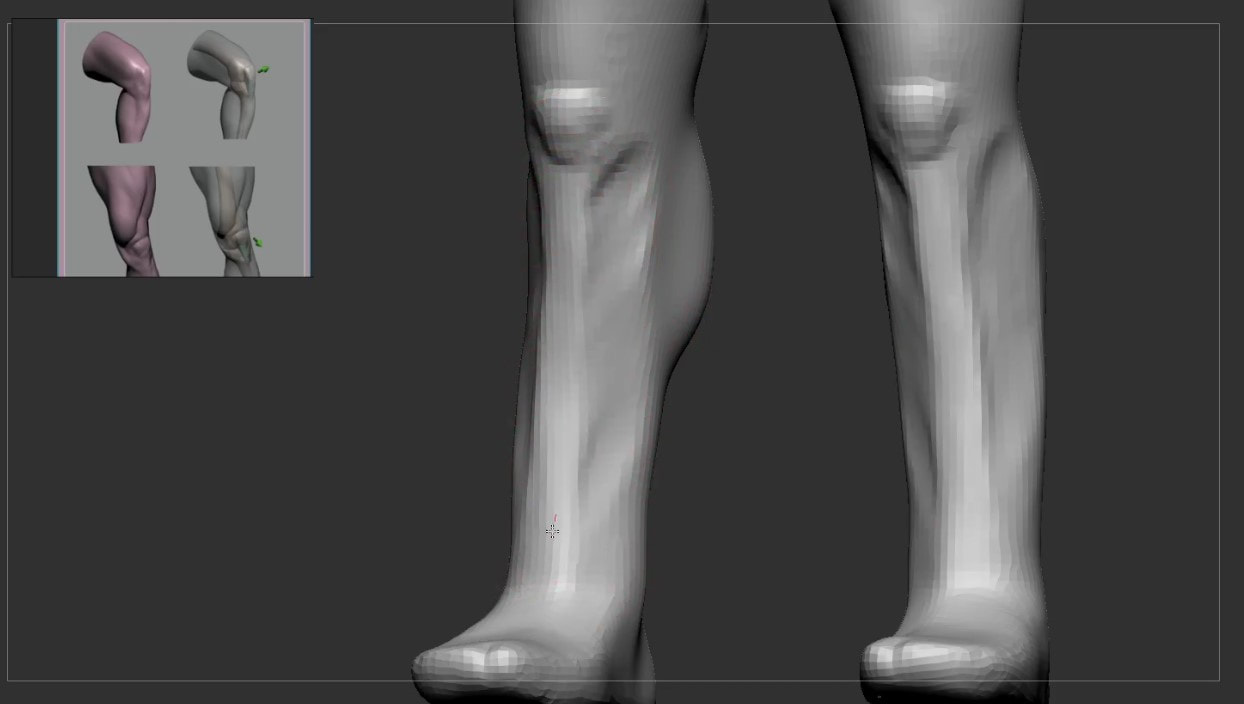
 Legs after Muscle Definition
After spending a few minutes blocking out the legs, here is what I get:
It's not the most realistic legs in the world, but I can use this a base for my final model, and I can always tweak some of the shapes during my anatomy sculpting if I have to. The block out is the most important thing in Character sculpting. You have to make sure the block out is solid enough for you to use, otherwise, you could ruin your design and have to fix what foundations you have built, So it's best to spend a bit of time making a decent base.
It's not the most realistic legs in the world, but I can use this a base for my final model, and I can always tweak some of the shapes during my anatomy sculpting if I have to. The block out is the most important thing in Character sculpting. You have to make sure the block out is solid enough for you to use, otherwise, you could ruin your design and have to fix what foundations you have built, So it's best to spend a bit of time making a decent base.
Hands
|
Sculpting hands can be difficult, depending on what style you're doing. When sculpting hands, the block out is to build the primary shapes and give them a gesture. I use a poly sphere in a separate tool and Dynamesh to a low resolution(between 5-10k). I use the move and clay buildup brush to create the shape of the palm. One thing to pay attention to is the proportions of the hand. I use my own as reference. After shaping the palm, I have two options. I could mask the fingers from the palm and extrude them out, or use the IMM primitive brush to create cylinders for each phalange. I chose to mask out the shapes and extrude. Doing it with the IMM brush can help get a cleaner base for the fingers and Dynamesh the hand together.
|
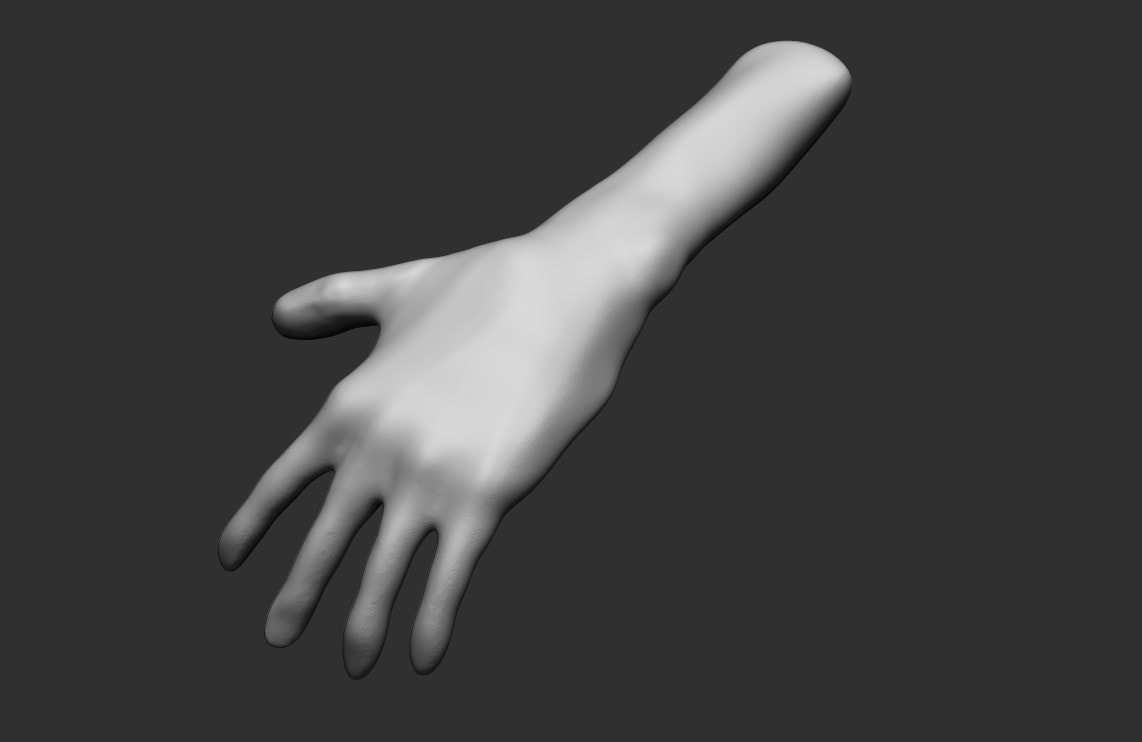
Sculpted hand in Zbrush
|
I hope these steps give you a better understanding of how I made the base mesh. This base mesh may not be of good quality. I did it so you can understand how to make a base mesh. These aren't the only steps, but these are important to know when character sculpting. With a lot of refining and tweaking the base mesh, I get to a point where I could start to think about character design. In the next section, we will go through detailed body design and basic texturing.
Part One - Body Design
Since I wasn't able to show you how I got to the block-out phase, I have made sure that I have recorded the design process of Váli. This Entire Video goes into the design of my Character for units 9-11, Váli.
This video is part one of the series. It shows Face Sculpting, Anatomy Design and Refinement, Fibermesh Experimentation, Skin Detailing, Skin Painting with Polypaint, BPR Rendering, and Final renders after this entire process. This model is not complete yet. Once I have uploaded the next video, you will see slight changes in the body. The next video will be about Clothing and the beginning of the accessories Design.
Here is a list of the timestamps:
00:00 - Body Muscle Design 01
01:51 - Face Sculpting 01
04:30 - Fibermesh Experimentation
06:42 - Face Sculpting 02
07:50 - Skin Detailing 01
09:18 - Skin Painting With Polypaint 01
10:04 - Body Muscle Design 02
19:07 - Skin Detailing 02
20:00 - Skin Painting With Polypaint 02
21:30 - Merging The Body Using Dynamesh, Zremesh, Subdivisions and Project
25:16 - Refining the Body After Projection
26:00 - Eye Detailing
26:35 - BPR Renders
27:30 - What I have done So Far
For you to understand what is going on in the video, I will explain what happens at each timestamp Below.
I am sculpting the body the way I want it to look. Using references I have on Pure Ref and using it loosely. I jump between using the references and implementing my design on the body. I'm not making a likeness sculpt, so there is no need to try and sculpt the reference accurately. The brushes I'm using are the clay, clay buildup, move and smooth to sculpt the muscle and get an idea of how I want my character to look. I'm sculpting with symmetry so I can quickly get something to represent each muscle group. I'm not worrying about the small details because it is not necessary at the moment. That will happen later in the video.
01:51 - Face Sculpting 01
In this section of the video, I start to build the face, using references found on Pinterest and Artstation. I wanted to make the character look young but be expressive. That was a bit tricky because the wrinkles that built the angry look made Váli too old. I had to balance it by bringing the cheeks in, making sure there wasn't a lot of hanging skin and excess fat around the face. I used Clay buildup with alpha 06, smooth and the move brush to achieve this. I changed the light source a few times to make sure that Váli's head looked right in various lightings.
04:30 - Fibermesh Experimentation
Here was the first time I used fiber mesh, so I experimented with the settings and tried to crate somewhat realistic hair, to get an idea of the design. I mainly focused on the beard, because I wanted to try fiber mesh and get used to it before I do the hair or anything else. at this stage, I was comfortable with using it, and then t was the matter of finishing the design of the body, so I can do the clothing.
06:42 - Face Sculpting 02
Now I'm focusing on the shape of the head. Earlier I noticed that the shape of the skull wasn't correct, for example. The forehead was too big, making the proportions of the face not fit with the head shape. This was not what I wanted. I took a close look at it and saw what was wrong and began to tweak and fix some of those shapes, using the same brushes (Clay, Move, Smooth, Dam Standard and Mask.) Once I was happy with the head shape, I noticed that Váli looked too old for my design. As mentioned in the Character profile, he's a young warrior and looks like a young adult, but I wanted to give him a scary expression, to show that he is tough. It was hard to balance the young look with a lot of wrinkles and details to express his fierce appearance. It took me a while to figure out his final look. At the end of this section, I was happy with how he looked. I felt that this was what Váli's appearance would be. I was comfortable to move on and focus on the Skin Detailing.
Now I'm focusing on the shape of the head. Earlier I noticed that the shape of the skull wasn't correct, for example. The forehead was too big, making the proportions of the face not fit with the head shape. This was not what I wanted. I took a close look at it and saw what was wrong and began to tweak and fix some of those shapes, using the same brushes (Clay, Move, Smooth, Dam Standard and Mask.) Once I was happy with the head shape, I noticed that Váli looked too old for my design. As mentioned in the Character profile, he's a young warrior and looks like a young adult, but I wanted to give him a scary expression, to show that he is tough. It was hard to balance the young look with a lot of wrinkles and details to express his fierce appearance. It took me a while to figure out his final look. At the end of this section, I was happy with how he looked. I felt that this was what Váli's appearance would be. I was comfortable to move on and focus on the Skin Detailing.
07:50 - Skin Detailing 01
The next step for the face was to start with some skin detailing. This would make the character pop and show that Váli is somewhat a realistic character and not stylized. Skin detailing is simple but to give the model more realism, variety is key. I didn't use one skin alpha throughout, I used multiple so my character wouldn't look symmetrical and uniform.
To skin detail in Zbrush, I used many skin pore and skin detail alphas I found on google and used the standard brush with the Drag Rect stroke, this is how it's done in production companies. It's good to learn that way and practice. It took me a couple of hours because I wanted it to look appealing. I could spend weeks on this alone, but I don't have that much time. I am happy with how it looks. If I had to change something, it would be to make the detail pop out more.
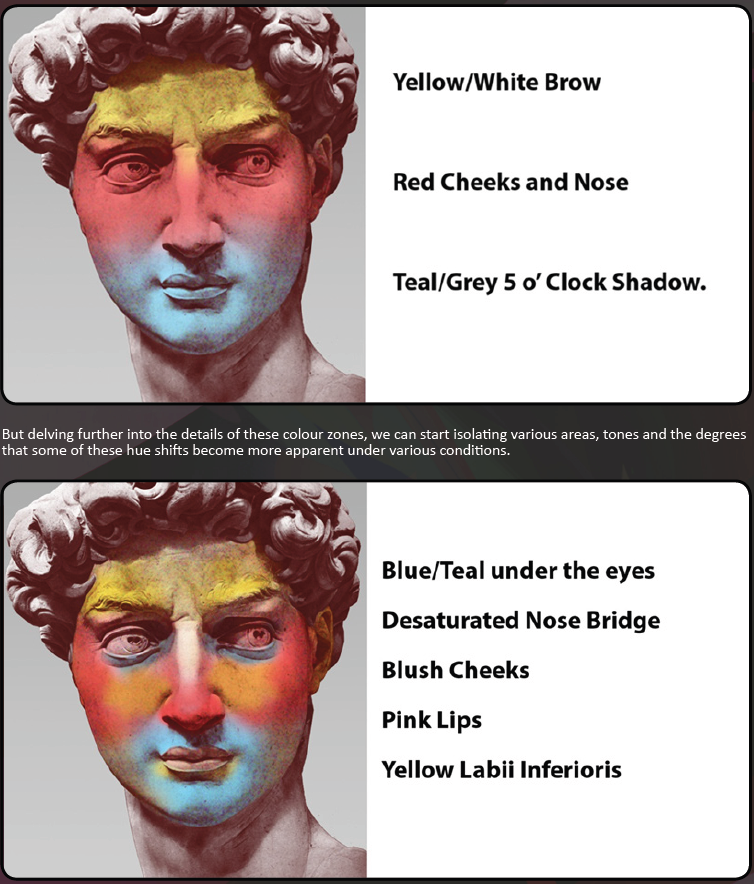 Skin Colour Zones
09:18 - Skin Painting With Polypaint 01
Painting the model helps me get an idea of what the character will look like with textures. It may not be actual textures but helps me by having some colour on my models. I poly paint in Zbrush so I don't have to go to another software just for textures. It's more efficient for me to use vertex colours as textures i.e Polypaint.
It's difficult to paint skin, but I practice it by using this image. This image helps me understand the general colours of areas of the face. Reds, yellows and blues are base colours on the skin but it can be expanded into greens and light purples. If I spent more time practising this, I could use the Polypaint as an actual texture map that I can render in Arnold (rendering engine in Autodesk Maya).
10:04 - Body Muscle Design 02
As mentioned before, I didn't like the first design of the body. This is the longest section of the video because I spent a lot of time figuring out what works for my character's physique. The first Body design was too symmetrical and looked fake, so with this new design I focused on the anatomy and made it asymmetrical to make it more believable, I felt that the first one had too much volume and it was put in the wrong places, so I remade the body but used the last one as a base for the new muscle. It is the same process as the first time. I used the same brushes but focused more on the design rather than the technical things. At the end of this section, you can see there is a night and day difference with the last design and this one.
As mentioned before, I didn't like the first design of the body. This is the longest section of the video because I spent a lot of time figuring out what works for my character's physique. The first Body design was too symmetrical and looked fake, so with this new design I focused on the anatomy and made it asymmetrical to make it more believable, I felt that the first one had too much volume and it was put in the wrong places, so I remade the body but used the last one as a base for the new muscle. It is the same process as the first time. I used the same brushes but focused more on the design rather than the technical things. At the end of this section, you can see there is a night and day difference with the last design and this one.
19:07 - Skin Detailing 02
Skin Detailing is the same process as detailing the face. I use multiple alphas to achieve a rough skin look and that's the detail I want Váli to have, he had a rough life and backstory so I believe that the rough skin can link to that, showing there is no softness to him. He is tough-skinned. I used many skin pore and skin detail alphas I found on google and used the standard brush with the Drag Rect stroke, this is how it's done in production companies, so it's good to learn that way and practice. The only difference in body detailing is there are more tiny details than in the face like the elbow, fingers, hands, back, chest etc. Varying the alphas I use, changing the intensity and focal shift help create a realistic and rough look. Next stage is the Polypaint. I want to give the details justice with the texturing so it doesn't ruin the model. Besides that, I like the details, but if I had to fix something I would pay more attention to the skin and micro details.
Skin Detailing is the same process as detailing the face. I use multiple alphas to achieve a rough skin look and that's the detail I want Váli to have, he had a rough life and backstory so I believe that the rough skin can link to that, showing there is no softness to him. He is tough-skinned. I used many skin pore and skin detail alphas I found on google and used the standard brush with the Drag Rect stroke, this is how it's done in production companies, so it's good to learn that way and practice. The only difference in body detailing is there are more tiny details than in the face like the elbow, fingers, hands, back, chest etc. Varying the alphas I use, changing the intensity and focal shift help create a realistic and rough look. Next stage is the Polypaint. I want to give the details justice with the texturing so it doesn't ruin the model. Besides that, I like the details, but if I had to fix something I would pay more attention to the skin and micro details.
20:00 - Skin Painting With Polypaint 02
I poly paint the body using the same approach as poly painting the face, using the same colour zones to achieve a solid skin colour. I use more dark brown to create shadows and the reds, blues and yellows for the veins and arteries. I use the Standard Brush and use colour spray and alpha 07 with RGB being the only mode on to paint. I've mentioned before, painting skin is difficult and takes time to understand what colours the skin has and how to create it by hand. I could spend many hours doing this but I don't have time.
I poly paint the body using the same approach as poly painting the face, using the same colour zones to achieve a solid skin colour. I use more dark brown to create shadows and the reds, blues and yellows for the veins and arteries. I use the Standard Brush and use colour spray and alpha 07 with RGB being the only mode on to paint. I've mentioned before, painting skin is difficult and takes time to understand what colours the skin has and how to create it by hand. I could spend many hours doing this but I don't have time.
21:30 - Merging The Body Using Dynamesh, Zremesh, Subdivisions and Project
This section is technically challenging. It involves merging the head, hands and body into one sub tool. Duplicating then Zremesh them together using Zremesh Guides brush to get cleaner topology. Subdividing and projecting it to the duplicate to get all of the details while having clean topology. I have done this so many times so it's not hard for me but for beginners, this process is very tedious, one mistake could destroy the model so be wary of doing this. I did this so you wouldn't see the seams from the head and hands when I animate the video in Maya.
This section is technically challenging. It involves merging the head, hands and body into one sub tool. Duplicating then Zremesh them together using Zremesh Guides brush to get cleaner topology. Subdividing and projecting it to the duplicate to get all of the details while having clean topology. I have done this so many times so it's not hard for me but for beginners, this process is very tedious, one mistake could destroy the model so be wary of doing this. I did this so you wouldn't see the seams from the head and hands when I animate the video in Maya.
25:16 - Refining the Body After Projection
After Projecting, some details are lost. I tend to make sure what I lost is put back so I don't lose so much sense. I used dam standard and applied more skin details using the standard brush, this wasn't important but I wanted my model to look good, so I spent 20 minutes refining it.
After Projecting, some details are lost. I tend to make sure what I lost is put back so I don't lose so much sense. I used dam standard and applied more skin details using the standard brush, this wasn't important but I wanted my model to look good, so I spent 20 minutes refining it.
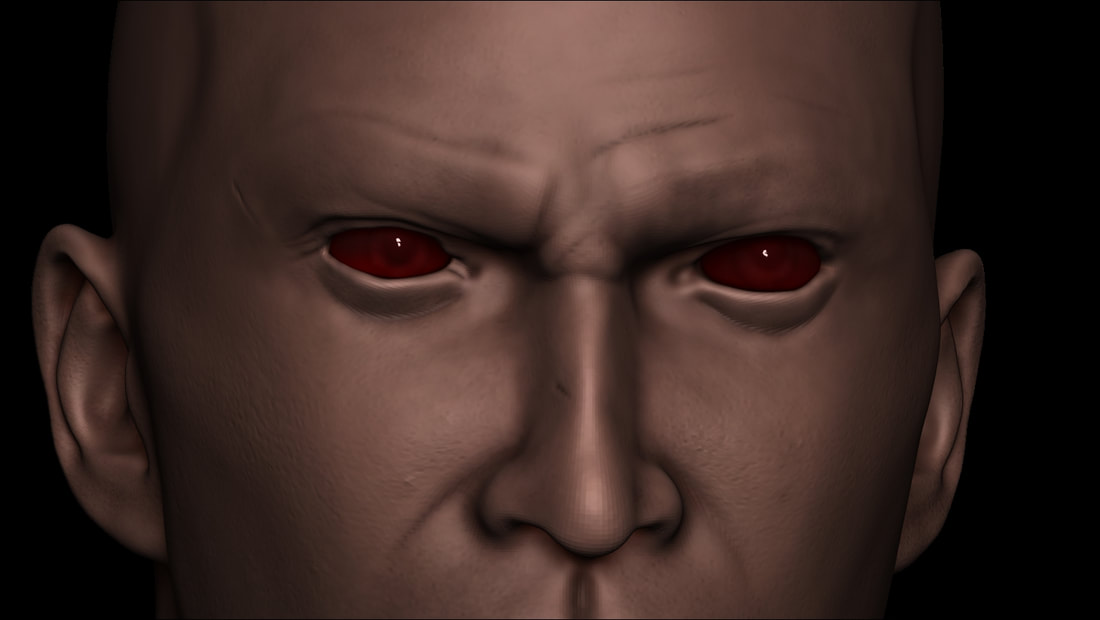
26:00 - Eye Detailing
Eye detailing is easy, use clay buildup to build the iris and then use an eye alpha and drag it on the eye using the standard brush and DragRect. The eye colour was just a deep red because the eyes will have an emission map.
Eye detailing is easy, use clay buildup to build the iris and then use an eye alpha and drag it on the eye using the standard brush and DragRect. The eye colour was just a deep red because the eyes will have an emission map.
Renders After Recording This Video
After this Video, I was so happy with Váli's look. I'm glad I didn't keep the body design from the concept made sure that the design looks realistic and has more of a design sense to it. I've been working on this project all day, every day and I'm glad that all of this hard work paid off to create an amazing piece. The next part of the production is sculpting the clothing, detailing and texturing further with more advanced techniques.
Part Two - Clothing, Detailing and Further Polypaint
In this new video, I sculpt some parts of clothing, detail the cloth using alphas and the standard brush, poly painting further with Mask by Cavity and Colour Spray. I texture with a mixture Of Zbrush and Substance. The poly paint will be a base colour and the roughness and normal Maps in Substance.
In the video, I explained that I didn't record the cloth sculpting because I wanted to focus and kept forgetting to record. I go over how I sculpt the clothing in the video. I use the mask brush on the main body to create the shape I need. I use the extract feature on Zbrush to create a new mesh based on the mask. I go into smoothing, dynamesh and use the clay buildup and standard brush to build volume and create folds and overall shape of the armour/clothing. For the shoulder pads, I used surface noise to tile the weave look so it adds more design and looks more realistic. The video was sped up to an hour. I had over 4 hours of recording. After this video, I loved the design. I was comfortable to move onto further texturing in substance.
Before I export, I decimate the model, which turns the topology into triangles but calculates where triangles should go, giving places with more detail more triangles and less detailed areas have larger triangles to compensate and retain as much detail as possible. I Unwrap all models with UV master and export all polypaint with Multi Map Exporter. Both are in the Zplugin window of Zbrush.
Evaluation After Zbrush
This was the longest section of the production. I was working every day to get the design right. I put so much effort into this character. I wasn't thinking of the project as a simple college project, I was thinking of it as a professional piece for a portfolio. I believe that all of the hard work paid off but in my opinion, and knowing what I know now after doing it, I missed the mark. I now realize some things I can add or redesign but I don't have the time to change anything and I had to publish it as a final model for texturing. I was focusing on getting it ready to export, rather than focusing on the design and how to make it more appealing to the audience.
I believe that my observational skills have improved dramatically compared to my concept. I have a better understanding of design sense and I know what things I do that are good or what things that aren't and how I could improve on it. Doing art is complicated, I have bad days and I have good days. What matters is how you take those bad days and use them a lesson to make better days.
I learnt that I work too much and become mentally exhausted. I am always on my computer 24/7. I am up until 3am almost everyday just sculpting. I learnt that I need to take a break sometimes and refresh my mind so when I go back into sculpting, I could notice more than what I did when I was up for so long. I have been told many times that I work too much by many of my peers, but I never noticed it until now. I could see my work change when I took a day off and relaxed. I learnt that I need to take a break if I start to feel mentally exhausted so I don't experience an art block.
After making Váli, I learnt that I should study anatomy more and start making my own production base meshes for male and female. I would do this as a personal project to study anatomy and understand the silhouette of a human body. Another thing that I've learnt is to practice my workflow and make it more ergonomic. I felt that I was wasting time fixing technical stuff that I could've fixed beforehand. I used Zremesh 30 times during this sculpt. Every time I Zremeshed I lost details after projecting which meant I had to sculpt them back in and it was a back and forth thing that could've been resolved at an early stage so I want to get a better understanding of my workflow and how to improve it.
After this section, I was really happy and I liked the design, however I know what things I could change and design again, but I didn't ave the time to.
Substance Painter
I go into Substance Painter to generate some roughness and Metallic maps for all of the models. The setup is based on the poly groups I set in Zbrush before I export the model. So every sub tool is there own texture set with their UV. Once I import the model, I need to bake all of the mesh maps to begin Texturing. Mesh maps are maps that hold data based on the model. These maps are based on the original model or projected from a highly detailed model onto a low poly model used for texturing.
The Mesh maps in question are:
The Mesh maps in question are:
- Normal
- World Space Normal
- ID
- Ambient Occlusion
- Position
- Curvature
- Thickness
BakingThe baking mesh map setup looks like:
This window pops up when you like on Bake Mesh maps or by pressing Ctrl+Shift+B. In this window, you are shown all Mesh maps on the left side, And on the right are all properties you can adjust. I was texturing with 4K (4096) maps. In hindsight, 4K was too heavy for Maya because it hindered my rendering speeds. I could've used 2K instead to help with performance. I set my Dilation width to 32 for an even number, Max rear distance to 0.85 and anti-aliasing to subsampling 4x4. Setting subsampling to 4x4, it adds more details to the maps with the expense of baking longer. Once I was happy with those settings, I pressed Bake all Mesh Maps and let Substance do its thing. It took about 45 minutes because it had to bake all of those maps for 21 texture sets. Which meant it had to bake 126 maps. Once baked, each map assigned to its proprietary slots for each texture set in the texture set settings. |
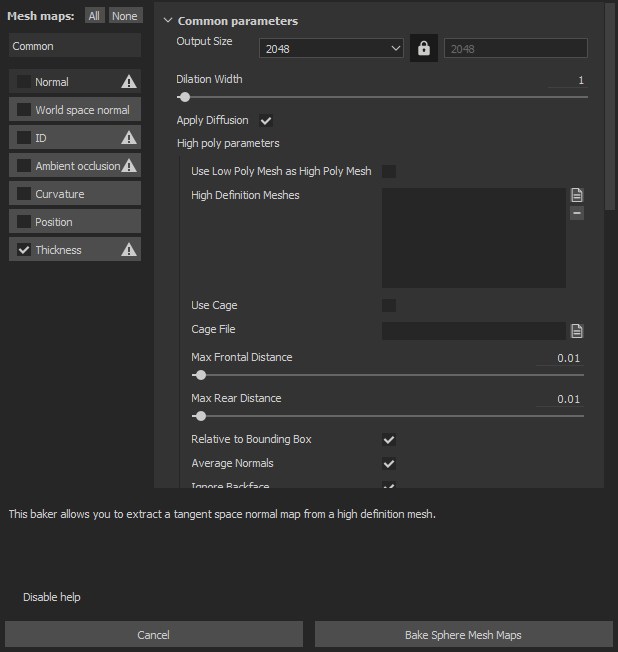
Baking Mesh Maps Setup in Substance Painter
|
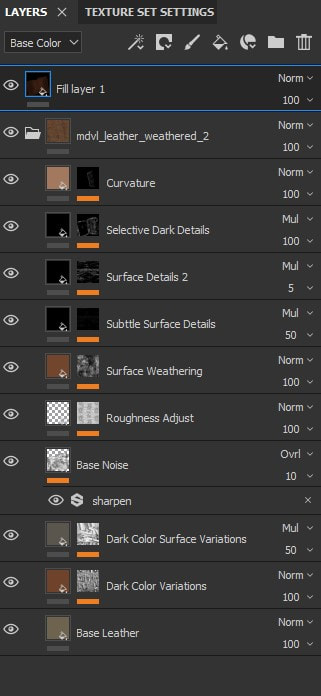
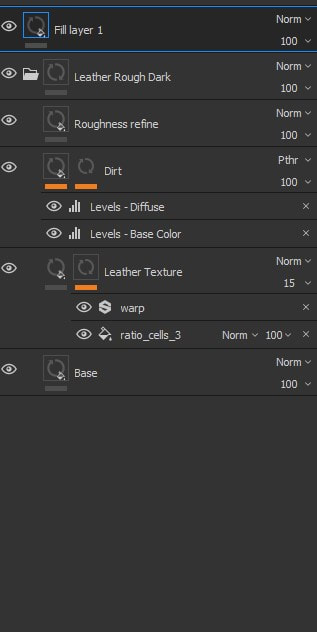
Smart Material Texturing
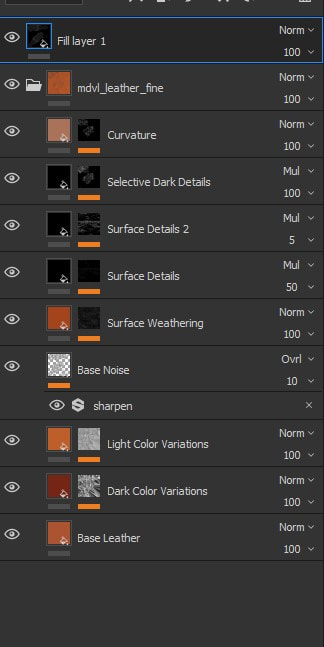
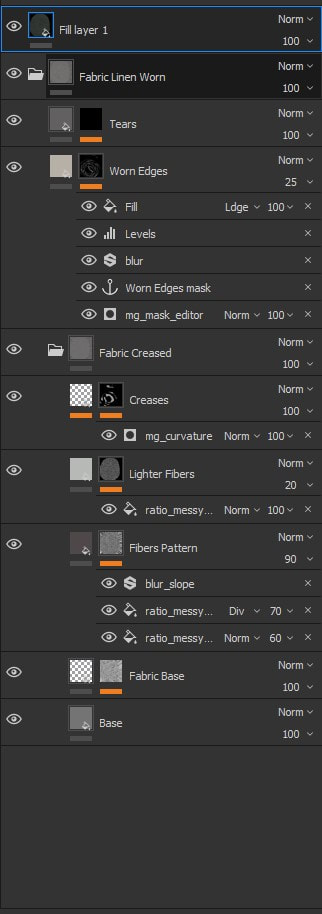
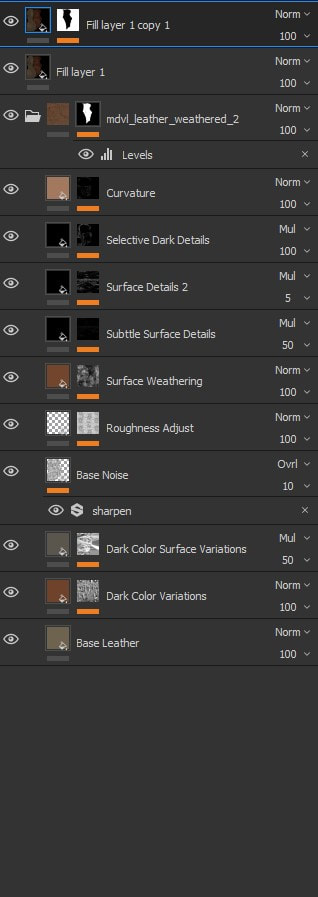
After Baking, all assets have their mesh maps assigned, meaning they are ready to be textured. I used smart materials for every mesh. Smart materials have a texture and use the mesh maps to drive the texturing information. For example, the roughness of leather could be driven by the curvature map. I do tweak some values in the smart materials. The defaults are pretty good. I don't need to worry about the colour because I'm using the polypaint in Zbrush to drive as the albedo map. Here are some screenshots of the materials I use for the assets. For the eyes, I made a simple emission map to give them some glow when rendering.
Here is what those Textures look like in the viewport:
Exporting Textures
The final step for Váli. Exporting the textures. I press export textures which opens a new window confirming all of the texture sizes, file formats, the type of maps exported and the bitrate of each texture image. Since I'll be using Arnold, I set the preset as AiStandard, which gives me these maps:
I hit Export and leave it until its complete.
- Base Colour/Albedo
- Normal (not needed)
- Roughness
- Metallic
- Height (not needed)
I hit Export and leave it until its complete.
Texture Maps
Evaluation After Designing Váli
After this painful process, I really liked making Váli. I loved the design. I loved making him with all of the details and textures. For being a student in college, I was impressed with what I had produced. The anatomy looked good and didn't look symmetrical. One thing I would've changed was some of the details in the skin. Some areas were too big and rougher. That's a simple fix, but I didn't realise the issue until I rendered it in Maya. I could have added some tertiary details like veins and arteries so he won't look stylised. I think adding veins would've made Váli look more realistic and add more little details that will make him stand out. I think the schedule prevented me from doing more stuff. It made me worry about whether I could expand Váli's design or keep him as is and continue with it. I believe the lack of technical ability played a part with this. Once I completed Váli's model, I learnt a lot more than I expected. I know what I could do to fix some of the artistic and technical mistakes. I didn't think of it as a simple college project (as I've mentioned before). I'm thinking about it as a professional project and a lesson to understand the animation pipeline.
After completing this project, I have learnt so much, like rendering Displacement and the key factors I should know when unwrapping a model. I know more about UDIMs and how I could apply them when texturing. I understand the pipeline with animation and rendering. I learnt that High-quality maps come with the expense of my computer specs. I need a contingency if something goes wrong.
After completing this project, I have learnt so much, like rendering Displacement and the key factors I should know when unwrapping a model. I know more about UDIMs and how I could apply them when texturing. I understand the pipeline with animation and rendering. I learnt that High-quality maps come with the expense of my computer specs. I need a contingency if something goes wrong.
