
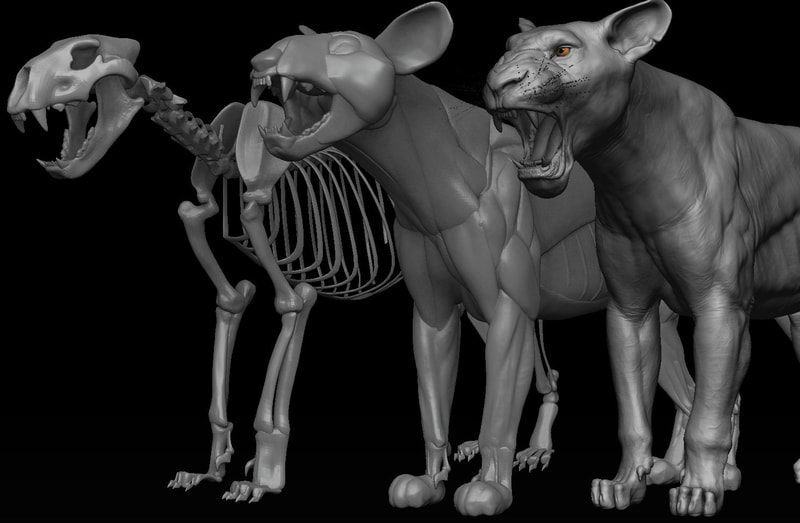
This Section will begin the Small projects linking to the FMP. When I finished Váli, I felt that the anatomy wasn't realistic and the muscle was overly exaggerated. I never made a base mesh before or have done a full male body as a study, so I feel like now is a good time to do one. Not only will I have a base mesh to use, but I can get a better understanding of the human body. As an aspiring character artist, anatomy is important to understand because the job requires you to be able to create human characters and other creatures that may have anatomical properties. Anatomy studies are what Character Artists do to show their understanding of anatomy to go on a portfolio, or just as an exercise to improve as a sculptor. There are many studies on social media. Here are a few examples: One particular source I use is Anatomy4Sculptors. They have a lot of images on their Instagram and their website https://anatomy4sculptors.com/ that show and describe anatomy such as facial expressions, movement of the arms, rotating torso etc. They go over both Male and Female and I recommend purchasing one of their books. It has helped me understand more on the body and the functions of certain muscles.

Why is understanding anatomy so important as a character artist/modeller?
Learning Anatomy is important as a modeller, but takes time in order to get a good understanding. As a beginner Artist, there are many common mistakes I made. I never paid attention to the underlying shapes and forms. You never really stop learning. It takes study and practice. Here Are some common mistakes that I did:
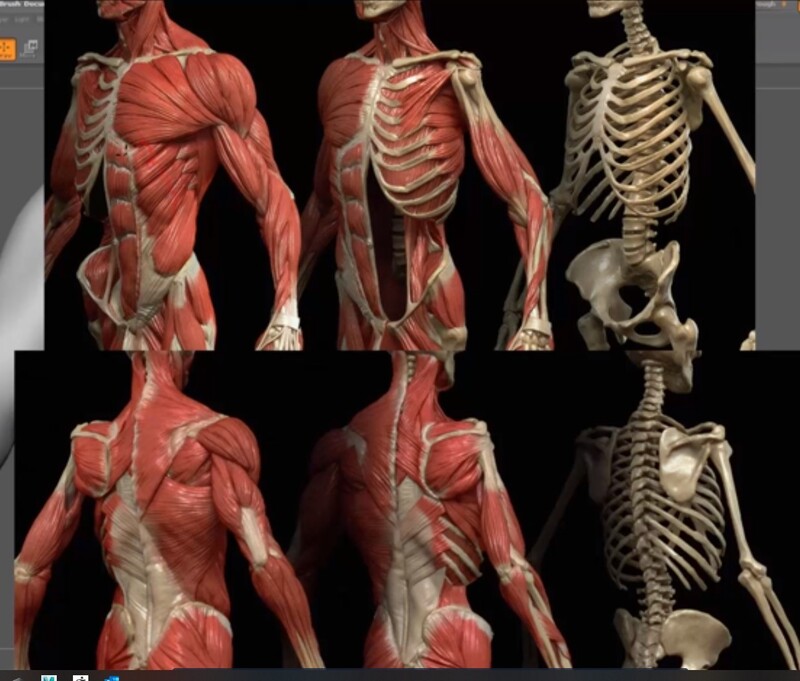
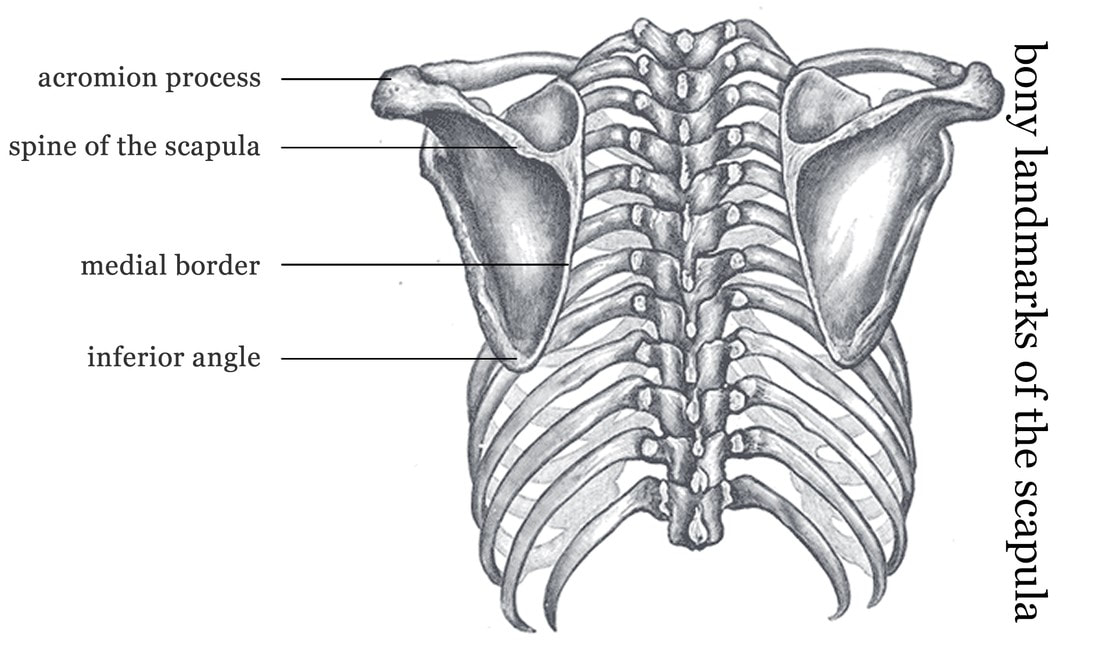 Bony Landmarks
Locate and maintain bony landmarks
When building a character with anatomical properties, Bony landmarks are essential to build a skeleton. Without them, the anatomy becomes very soft, and muscle groups tend to flow in strange directions. Examples of bony landmarks are shoulder blades (Scapula), Collar Bone (Clavicle), Spine, Kneecaps, Elbows, Ulna, ankles, fibula and more. Once there is a clear identification of the landmarks it's a lot easier to connect the muscle groups. This information is particularly vital to riggers and animators.
When building a character with anatomical properties, Bony landmarks are essential to build a skeleton. Without them, the anatomy becomes very soft, and muscle groups tend to flow in strange directions. Examples of bony landmarks are shoulder blades (Scapula), Collar Bone (Clavicle), Spine, Kneecaps, Elbows, Ulna, ankles, fibula and more. Once there is a clear identification of the landmarks it's a lot easier to connect the muscle groups. This information is particularly vital to riggers and animators.
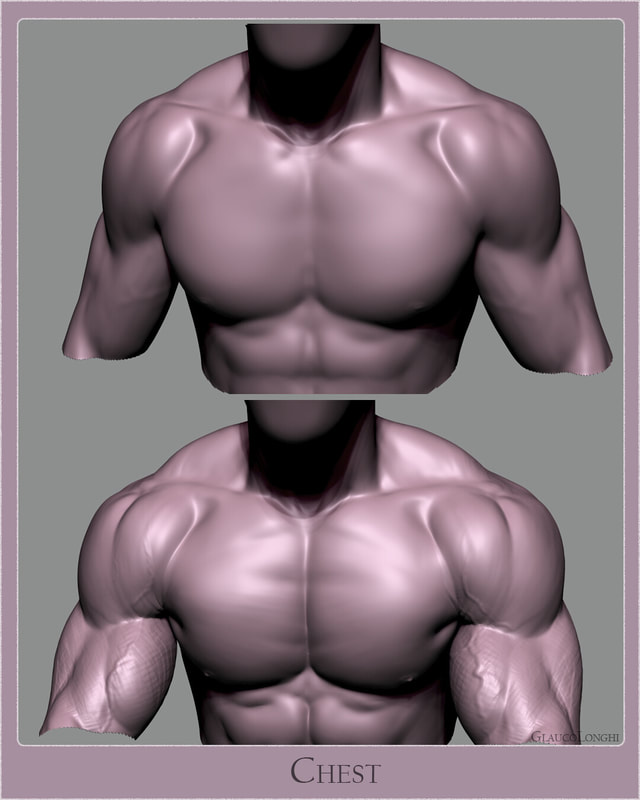
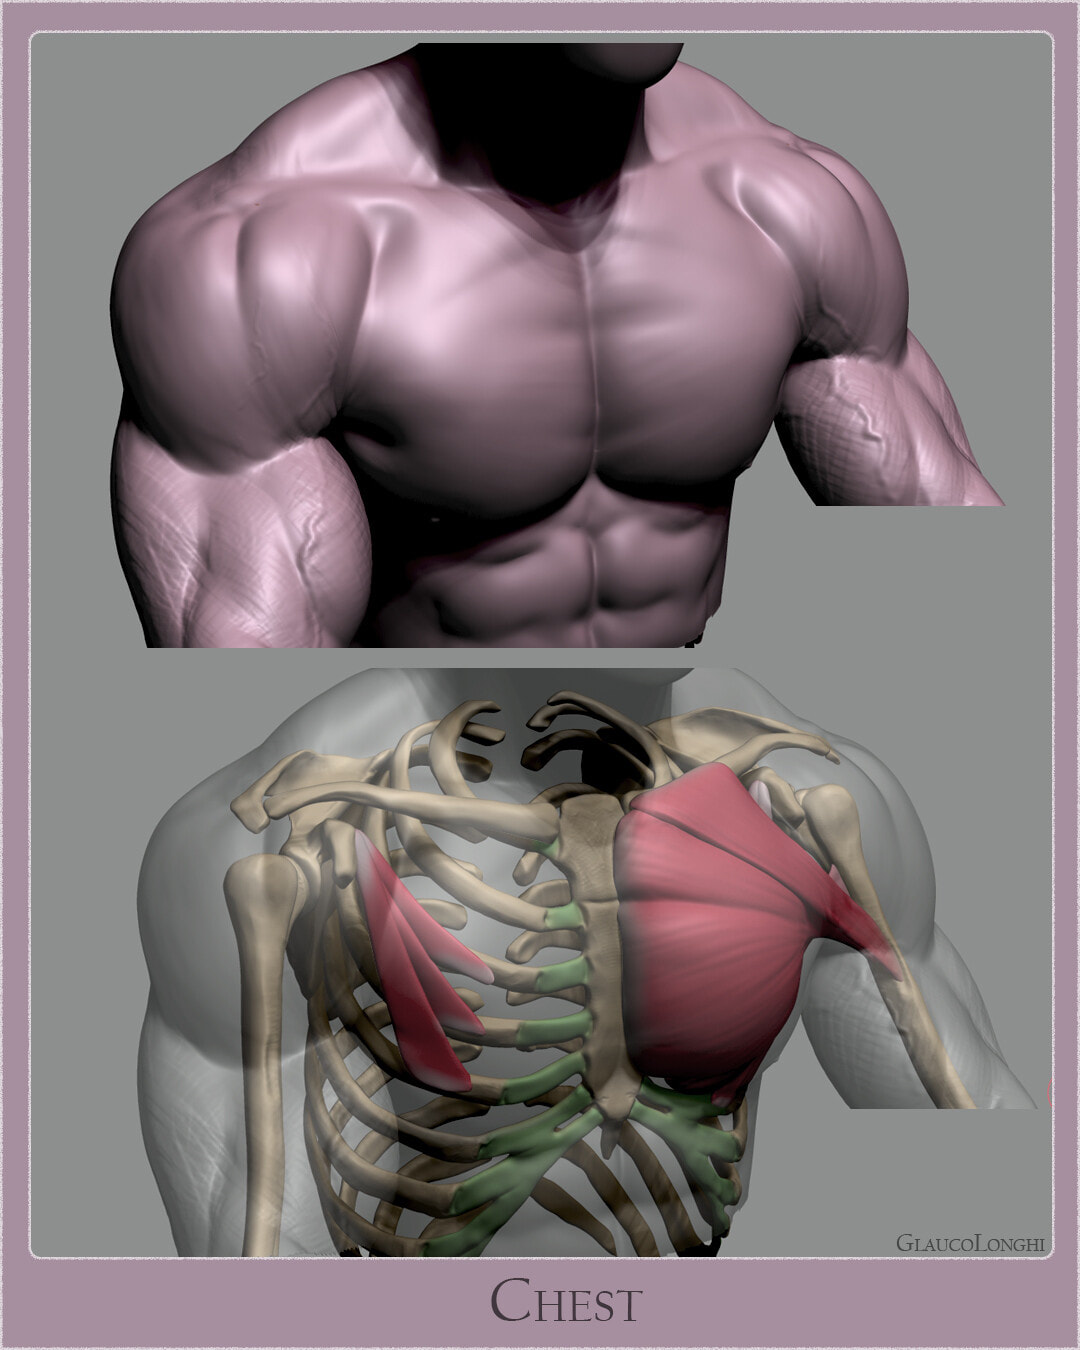 Glauco Longhi - Chest Anatomy
Chest muscle spans to upper arm
The purpose of the chest muscle is to pull the arm across the body, so it makes sense that it must span across to the upper arm. The mix-up that individuals make very regularly is to leave the chest muscles as a rectangular mass on the chest with no link with the upper arm. In order to build a solid body, you must understand insertions and origins. There is no need to know all of the names understand every bone of the skeleton, but knowing the shapes and forms of each muscle and insertions points. The chest muscle (pectoralis major) originates from the inner part of the clavicle, the sternum, and the top of the abdomen at the fifth rib. The muscle then spans across the shoulder joint and inserts onto the outside of the upper arm bone.
The purpose of the chest muscle is to pull the arm across the body, so it makes sense that it must span across to the upper arm. The mix-up that individuals make very regularly is to leave the chest muscles as a rectangular mass on the chest with no link with the upper arm. In order to build a solid body, you must understand insertions and origins. There is no need to know all of the names understand every bone of the skeleton, but knowing the shapes and forms of each muscle and insertions points. The chest muscle (pectoralis major) originates from the inner part of the clavicle, the sternum, and the top of the abdomen at the fifth rib. The muscle then spans across the shoulder joint and inserts onto the outside of the upper arm bone.
The scapula is key to the back muscles
The back muscles are one of the hardest parts of the body to sculpt and draw. It is hard to find a balance with muscle and bony landmarks. One mistake I noticed from Unit 9-11's Váli, was the Back was not proportionate and didn't look natural. The muscles looked flexed and if I were to compare it with a realistic male bodybuilder, my sculpt would be anatomically incorrect. One important step when sculpting the back muscles is to identify the spine and the scapula. Without them, there wouldn't be a clear understanding of where the insertions and origins of the back muscles are. Not knowing them can cause issues with proportions if not fixed at an early stage.
The back muscles are one of the hardest parts of the body to sculpt and draw. It is hard to find a balance with muscle and bony landmarks. One mistake I noticed from Unit 9-11's Váli, was the Back was not proportionate and didn't look natural. The muscles looked flexed and if I were to compare it with a realistic male bodybuilder, my sculpt would be anatomically incorrect. One important step when sculpting the back muscles is to identify the spine and the scapula. Without them, there wouldn't be a clear understanding of where the insertions and origins of the back muscles are. Not knowing them can cause issues with proportions if not fixed at an early stage.
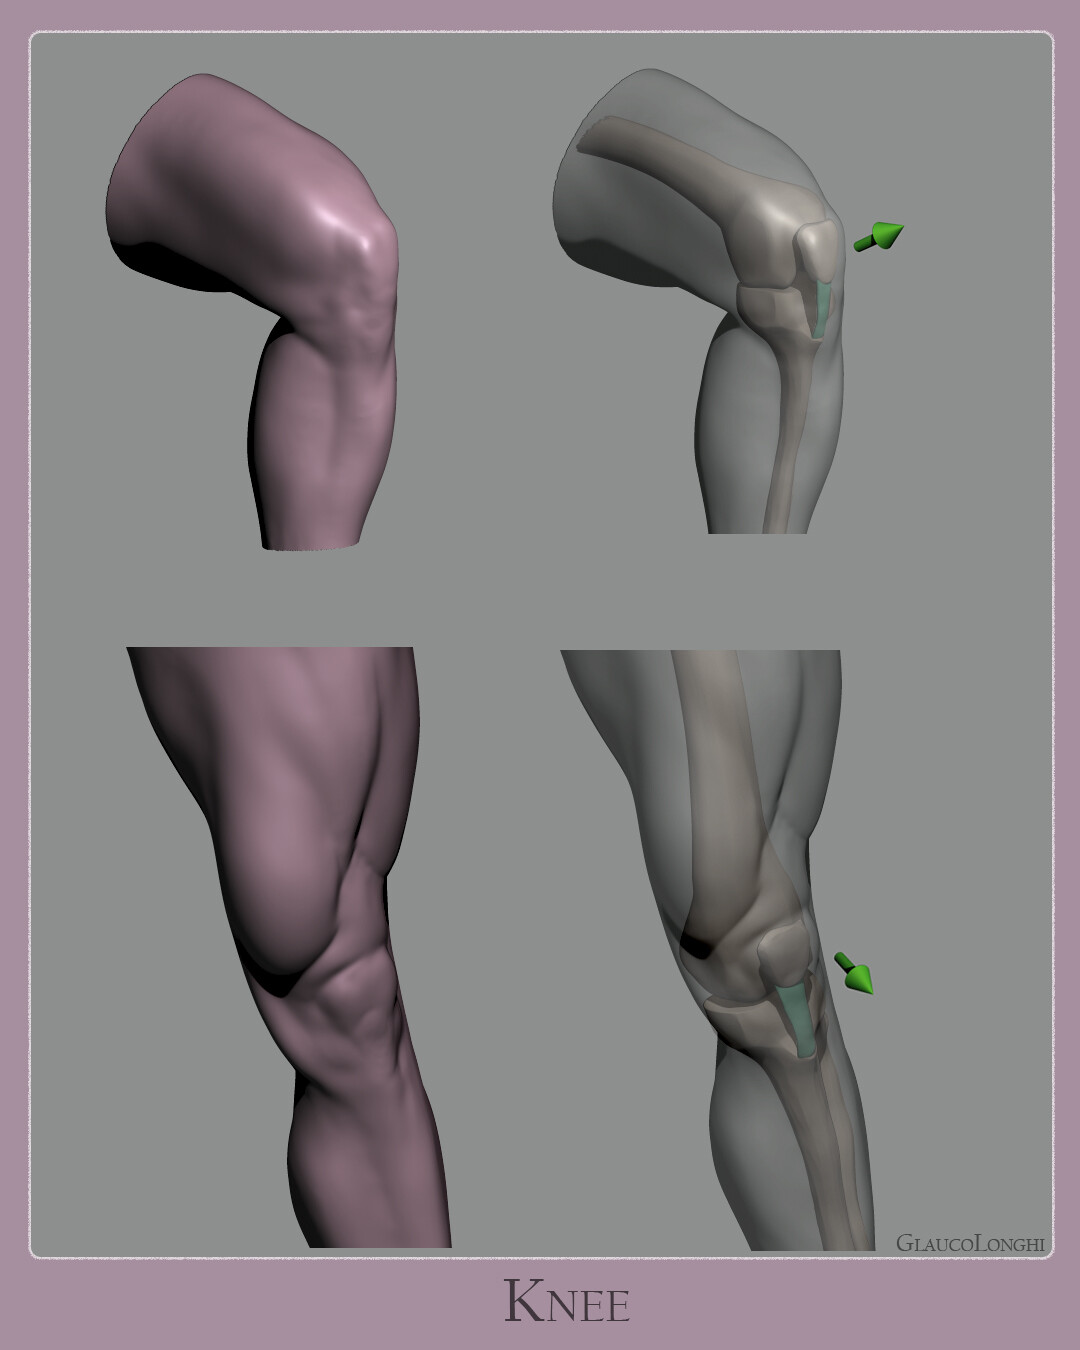
Correct construction of the knees
To build the knee correctly, you need to understand the construction of the joint. Three bones make up the knee joint: the lower end of the femur, the top end of the tibia, and the knee cap. If it's not constructed properly, it tends to look like a bulge protruding between the leg. The shape of the knee and be misunderstood when looking at anatomy references, but with practice and looking at a mixture of anatomical charts and human body references, sculpting the knee will become second nature. one thing to understand when sculpting humans, the more you do it, the easier it'll get overtime.
To build the knee correctly, you need to understand the construction of the joint. Three bones make up the knee joint: the lower end of the femur, the top end of the tibia, and the knee cap. If it's not constructed properly, it tends to look like a bulge protruding between the leg. The shape of the knee and be misunderstood when looking at anatomy references, but with practice and looking at a mixture of anatomical charts and human body references, sculpting the knee will become second nature. one thing to understand when sculpting humans, the more you do it, the easier it'll get overtime.
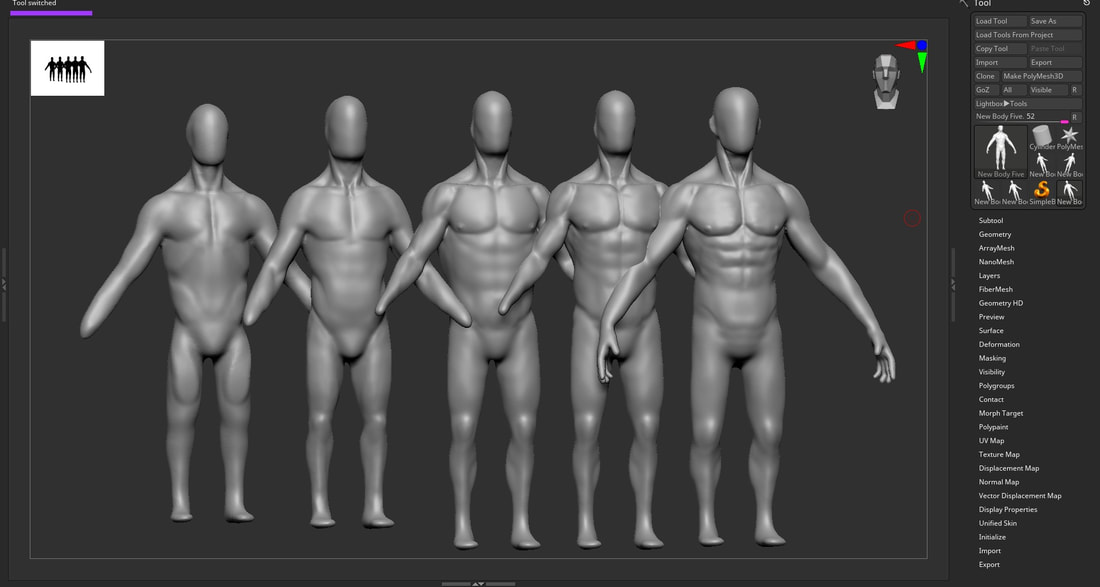
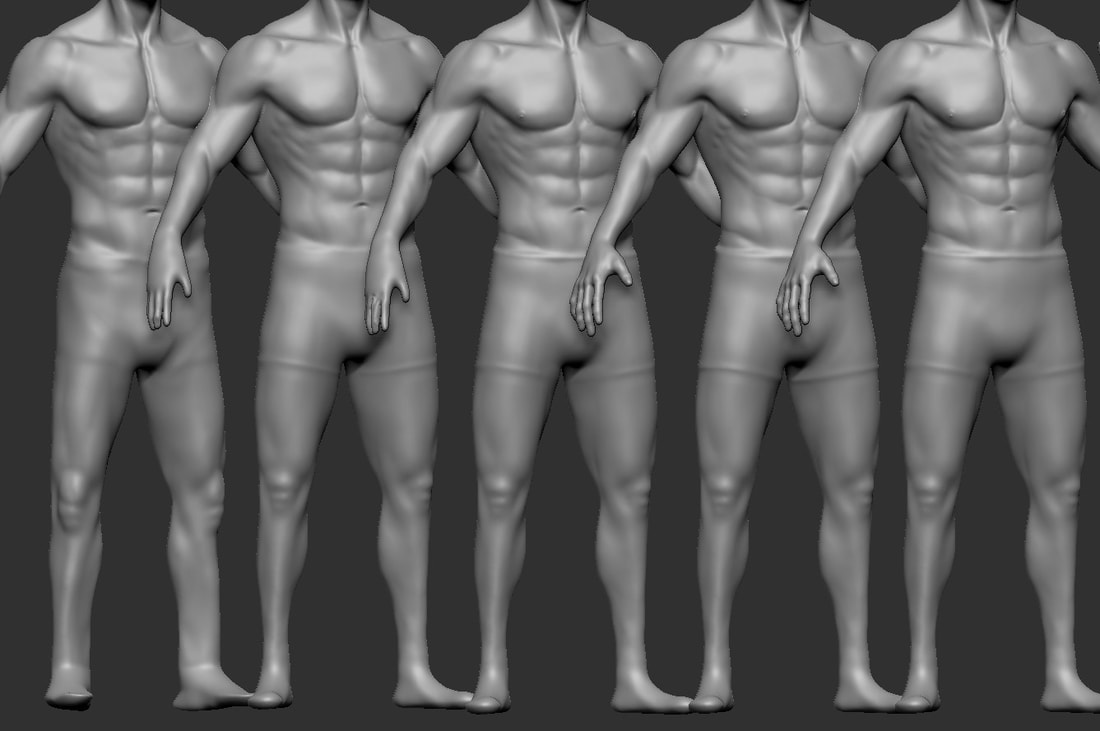
Finished Study - Evaluation
With all things considered, here are the final results:
I'm glad I have completed my first study and have made my own base mesh. It took me roughly 72 hours stretched out to 3 weeks because I have a lot more work going on too, I compared the anatomy to Váli (Unit 9-10) and noticed a lot of differences. This one is more realistic and the muscle is exaggerated like Váli. Bare in mind that this is my first anatomy study, I have a lot more to do and I have to keep doing it in order to improve and further myself as an artist.
If I compare this to senior character artists' studies, I have a lot more work to do. With more effort and repetition, I will be able to build the human body within a few hours. Character Artists have to be efficient when sculpting. When working in studios, Artists are provided with base meshes, but that doesn't mean it's not necessary to build one themselves.
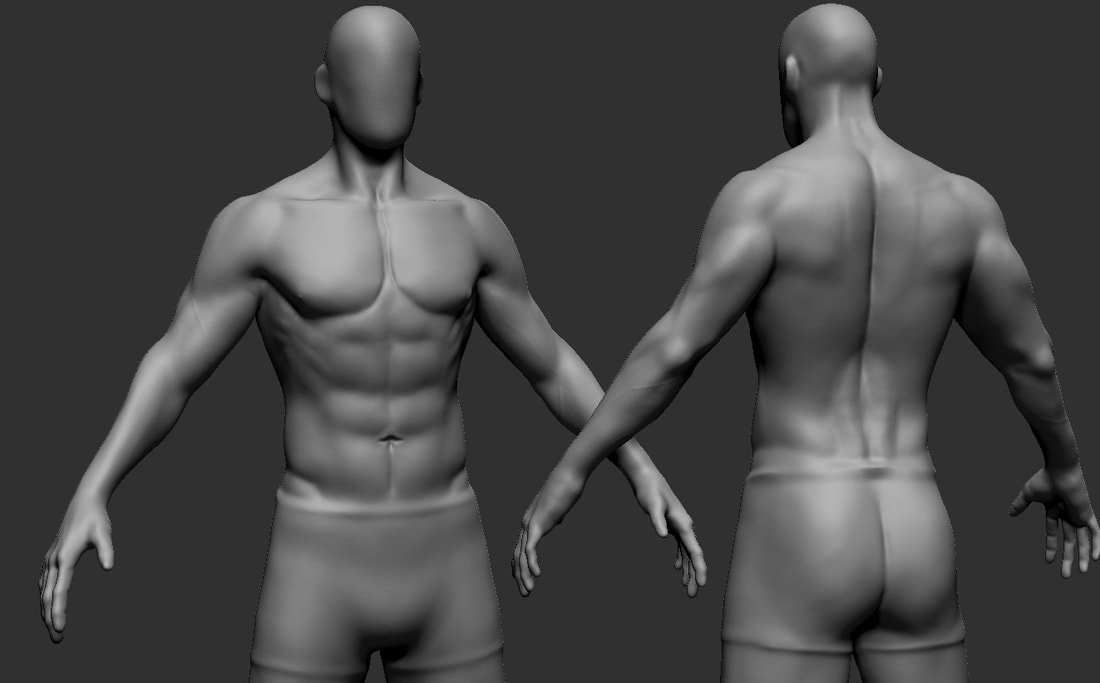
If I was to improve on my work, I would pay more attention to the Back muscles and the feet. The Back muscles are complex because of the many muscle groups and the form of it. Once you are able to build a solid back on a human body sculpt, it will look more natural. My sculpt doesn't look natural at the back, so I'll pay more attention to that in the future. The feet are weirdly shaped. I didn't sculpt the feet because I didn't think it was necessary, but I realised just because I don't believe its needed doesn't mean that It's not necessary. I plan to do a separate study on hand and feet because they are just as important as any other body part.
If I compare this to senior character artists' studies, I have a lot more work to do. With more effort and repetition, I will be able to build the human body within a few hours. Character Artists have to be efficient when sculpting. When working in studios, Artists are provided with base meshes, but that doesn't mean it's not necessary to build one themselves.
If I was to improve on my work, I would pay more attention to the Back muscles and the feet. The Back muscles are complex because of the many muscle groups and the form of it. Once you are able to build a solid back on a human body sculpt, it will look more natural. My sculpt doesn't look natural at the back, so I'll pay more attention to that in the future. The feet are weirdly shaped. I didn't sculpt the feet because I didn't think it was necessary, but I realised just because I don't believe its needed doesn't mean that It's not necessary. I plan to do a separate study on hand and feet because they are just as important as any other body part.
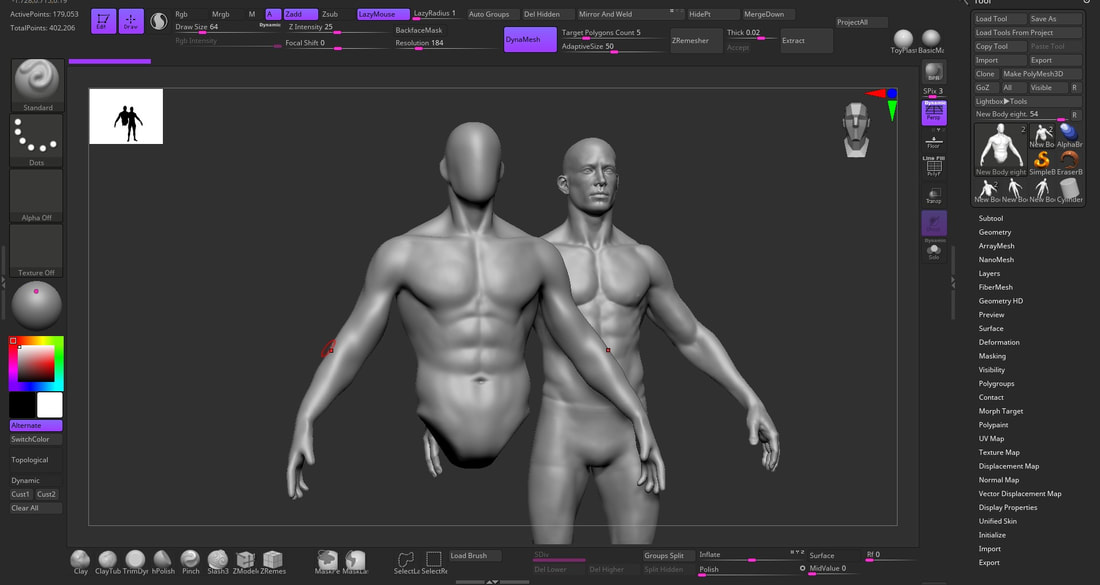
The Process
Here is a step-by-step guide on how I got to my final product.
The same with every project, I start with a poly sphere and use the move and clay brush to build the base of the body. I'm not paying attention to any muscle groups I'm just starting with the proportions and building a simple guide when I'm ready to add the muscle groups. My method is based off the same process Raf Grassetti uses in his Anatomy course on Gumroad. Most important thing to understand when sculpting is nothing will look any good in the beginning. It's a massive learning curve that I and many beginners experience when sculpting but I understand that it's part of the process and you have to ride that wave until you feel comfortable with what you're making .Once I'm happy with it, I start to indicate the muscle groups using Dam standard and the Clay brush. Here are screenshots of the first step:
Over time, I felt that the legs were getting in my way and were throwing me off, so I got rid of them and focused on the torso. I spent and hour on sculpting the torso. One method of using reference I found was from a very talented artist by the name of lya Gagarin. He imports other base meshes and places them in the same project so it's next to the mesh he's sculpting, That method was interesting and I wanted to try it out, like so: the base mesh used is from the content of Raf Grassetti's anatomy and design course.
I continued to build the torso using my references until I was comfortable to add the legs. I add the legs by masking the leg shape on the bottom and used the transpose lines to extrude them. One thing to consider is the feet and legs aren't pointed straight if you were to stand normally. They are at an angle. One thing I used to do was sculpt the legs straight, which didn't look natural. Here is what I had gotten to by the time I had sculpted the legs.
Evaluation
The Final step is to adjust the proportions and fix the posture. After all of that I got to this final piece:
I'm really happy that I got to make an anatomy study/ Base mesh. I still have a long way to go and I plan to do more studies in the future. One I'm eager to do are the hands and feet. There are complicated and complex, which is why artists find anatomy studies hard as a beginner. In the future, I'll pay more attention to real life reference and try to sculpt a posed anatomy study.
I'm really happy that I got to make an anatomy study/ Base mesh. I still have a long way to go and I plan to do more studies in the future. One I'm eager to do are the hands and feet. There are complicated and complex, which is why artists find anatomy studies hard as a beginner. In the future, I'll pay more attention to real life reference and try to sculpt a posed anatomy study.
Bibliography
Instagram. undated. [online] Available at: <https://www.instagram.com/anatomy4sculptors/> [Accessed 15 February 2021].
Anatomy For Sculptors. undated. Understandable Anatomy Books For Artists. [online] Available at: <https://anatomy4sculptors.com/> [Accessed 15 February 2021].
Artstation. 2014. Ecorché Statue. [online] Available at: <https://www.artstation.com/artwork/yYPK> [Accessed 16 February 2021].
Artstation. 2019. Anatomy Studies - Part 02. [online] Available at: <https://www.artstation.com/artwork/BmvYQk> [Accessed 16 February 2021].
Artstation. 2018. Anatomical Studies. [online] Available at: <https://www.artstation.com/artwork/5zKKW> [Accessed 16 February 2021].
Artstation. 2020. Female Anatomy Tutorial. [online] Available at: <https://www.artstation.com/artwork/baWo3n> [Accessed 16 February 2021].
Artstation. 2016. Lion. [online] Available at: <https://www.artstation.com/artwork/oJe54> [Accessed 16 February 2021].
Artstation. 2019. anatomy-Skull Study. [online] Available at: <https://www.artstation.com/artwork/XBBbwL> [Accessed 16 February 2021].
Package, D., 2021. Design and Anatomy Package. [online] Gumroad. Available at: <https://gumroad.com/l/YGTL> [Accessed 18 February 2021].
ArtStation. 2021. Ilya Gagarin. [online] Available at: <https://www.artstation.com/gagarin> [Accessed 18 February 2021].
