
In this Section, I'm going to discuss Texturing.xyz and why I'll be using their products to detail and texture my human characters. Texturing.xyz is one of the best ways to add detail to characters and it can be used in many situations. I have a skin Pack that I will describe and show what it includes. Then I am going to discuss a few ways to use the contents of the pack.
Texturing.xyz
Texturing.XYZ is a company that creates high-quality maps of skin, cloth, metal, animals and more using photogrammetry and scans. Texturing.XYZ's, "Desire is to share with texture lovers everywhere, high-resolution data that can be found at the biggest and best companies in the industry but an affordable price. We aim to provide the best materials possible in a lossless compression format with all the map derivations to make texturing easy and effortless." Texturing. XYZ. 2021. About Us. [online] Available at: <https://texturing.xyz/pages/about-us> [Accessed 1 February 2021].
Founded in 2015, Texturing.XYZ is well known in the games and film industry because of the high quality and how much it's used in big-budget production studios, such as MPC, Image Engine, Weta Digital and more.
Another great example is sold on their website. This was used to create the skin for Thanos from Avengers: Infinity War and Avengers: Endgame :

Click the Image to be taken to the website
This is accessible to everyone, but all of the products on the website have prices and not particularly cheap. Despite that, It's worth it. I have been using their products for a week and I'm really impressed with the results. There are a lot of different ways to get the skin details onto characters. One of the most used way is using a mix of Maya, ZBrush, Wrap, and Arnold. I don't use this method because Wrap is a paid product and I can't afford it and looks very complicated. Many professional artists uses this method because it gets great results. The main Idea of this method is to warp the texture maps' face onto the Zbrush sculpted face.
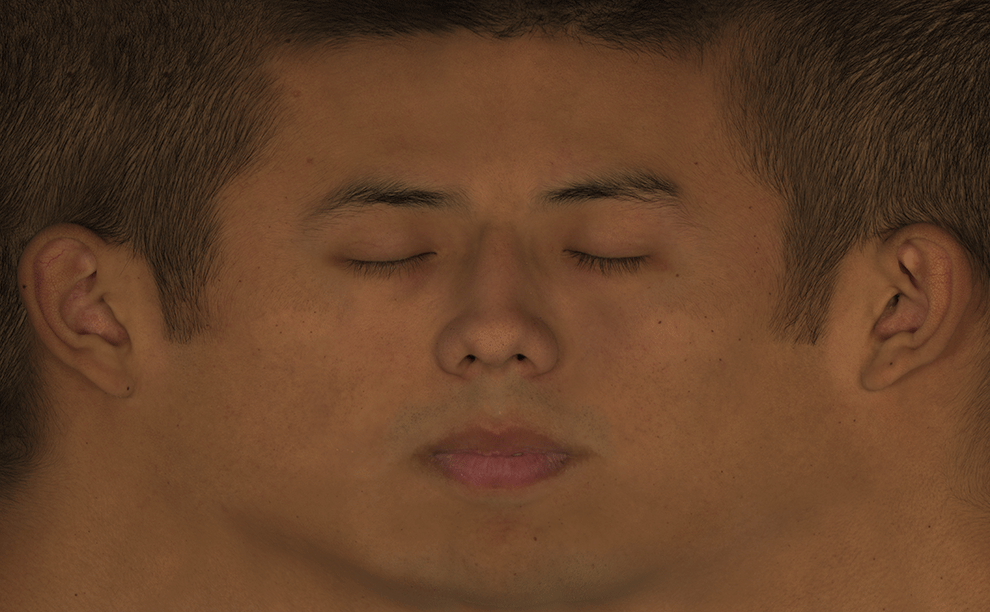
Albedo Map
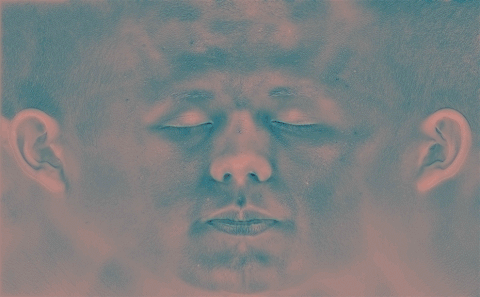
Displacement map
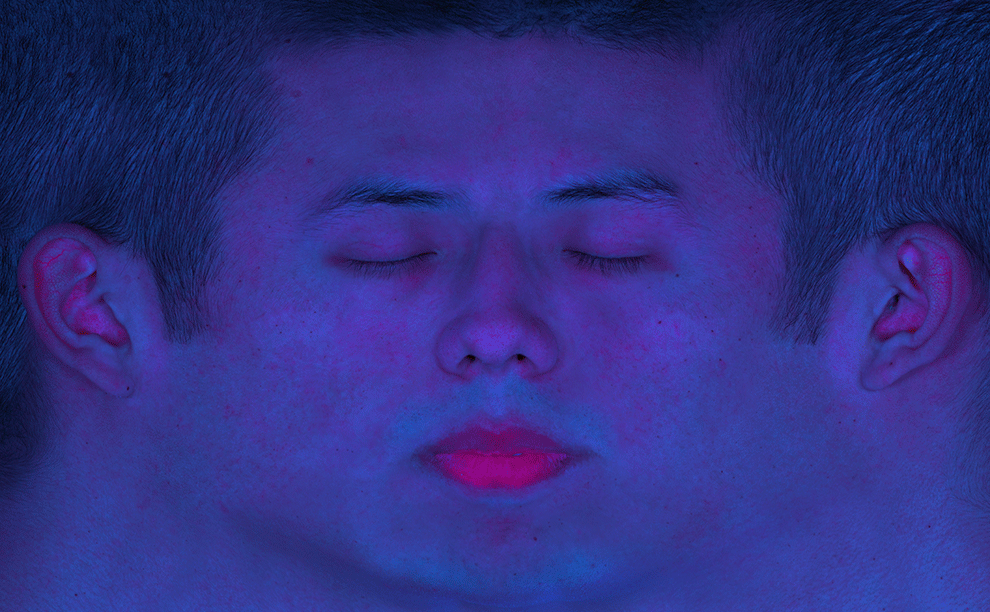
Utility Map
|
This is a Texturing.XYZ albedo map. This is based of a real persons face. Using Wrap, the goal is to change the shape of the maps' face and to project and warp onto the Zbrush sculpted face. Using clean topology and anchor points to determine what goes where.
This is the Displacement Map. The displacement map contains three levels of detail: secondary, tertiary and micro combined into the RGB channels of a single texture for ease of use, this can be used to create believable looking skin and highly detailed renders. This allows artists to take control of their projects and be able to level up their work. The Displacement map would be painted onto the 3D model first then separate the channels into their own proprietary displacement maps.
Red-Displacement Green-Secondary Displacement Blue-Micro Displacement This Is a Utility Map. This Map is mainly used to adjust the albedo map's skin tone and colour. It can be adjusted in photoshop to create a new colour map or to export a specular map. There are three types of details in the channels, similar to the three channel displacement. The channels include: Red-Haemoglobin Green-Melanin Blue-specular map |
My Skin Texturing Process.
I had recorded my process prior to any other case study. I wanted to experiment with Mari and Texturing.xyz maps early so I could be ready in time for my FMP. I'm going to sum up the video in this section. Please watch the video to Understand what I'm doing.
I explain why I bought the Texturing.xyz maps and how I plan to use Mari. After my voiceover, It shows me using the paint through brush to project my displacement onto the model. One issue I have with Mari is that I can't project multiple maps at the same time, like Substance Painter. I got to a stage where I had to project the lips onto the model. I painted the map on then I used the warp brush to select the lip and manoeuvre it where it should be, which is a really good feature. Once I'm happy with the projection, I attach a Shuffle node to my layer which allows me to switch channels. That way I can export three displacement maps for the various amount of detail.
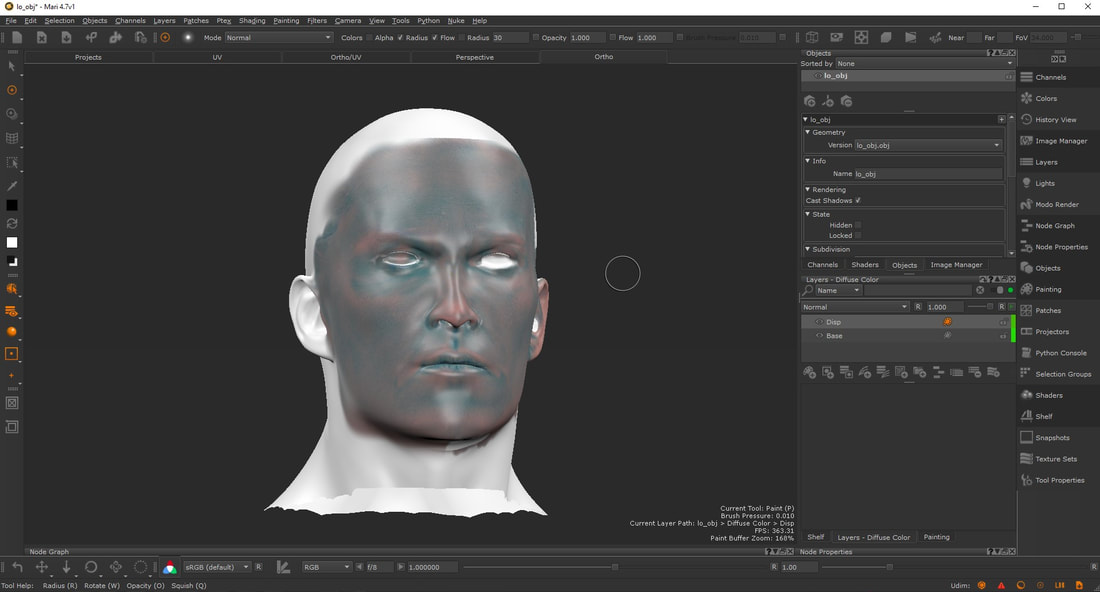
Mari
|
After that, I import the displacements into Zbrush as a texture. I create a layer for each displacement and attach them to their designated layers. Applying the displacements that way allows me to have more control over the strength of the displacement. I had also stored a Morph Target to paint the more harsh areas of displacement. Once I'm happy with the strength of the displacement, I add layers on top to refine and correct any artefacts. Those layers are named as
|
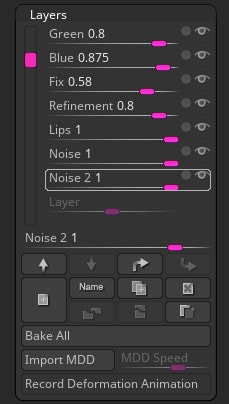
Zbrush Layers
|
The fix and refinement layers are erased areas using the morph target and adding on skin details using the alphas I got from my Texturing.xyz Skin Starter Kit. The two Noise layers are simply Surface Noisemaker to add more roughness and shape to the specular highlights. Once that's done, I get this:

Zbrush Clean up
At this stage, I'm ready to export the Displacement map from Zbrush to go into Maya. I did this using the Multi Map Exporter under ZPlugin.
Here are my Settings:
Here are my Settings:
- Map Size 8192 (8K) This is Optional, I recommend doing 4K as a start.
- SubDiv Level: 2 (Meaning that the displacement will be calculated base of that subdivision. This tends to be the level you export)
- DPSubPix: 4
- 32bit and EXR (Higher Quality)
- Mid Value: 0 (you can do 0.5 but that means you would have to adjust your scalar value to 0.5, it's much easier to set Mid Value to 0 beforehand)
- Adaptive: OFF! (Do not us this at all. It says that it creates a higher detailed map with the expense of longer exporting time, but there is no difference with it On or Off, but longer export times. I highly Recommend leaving it off.
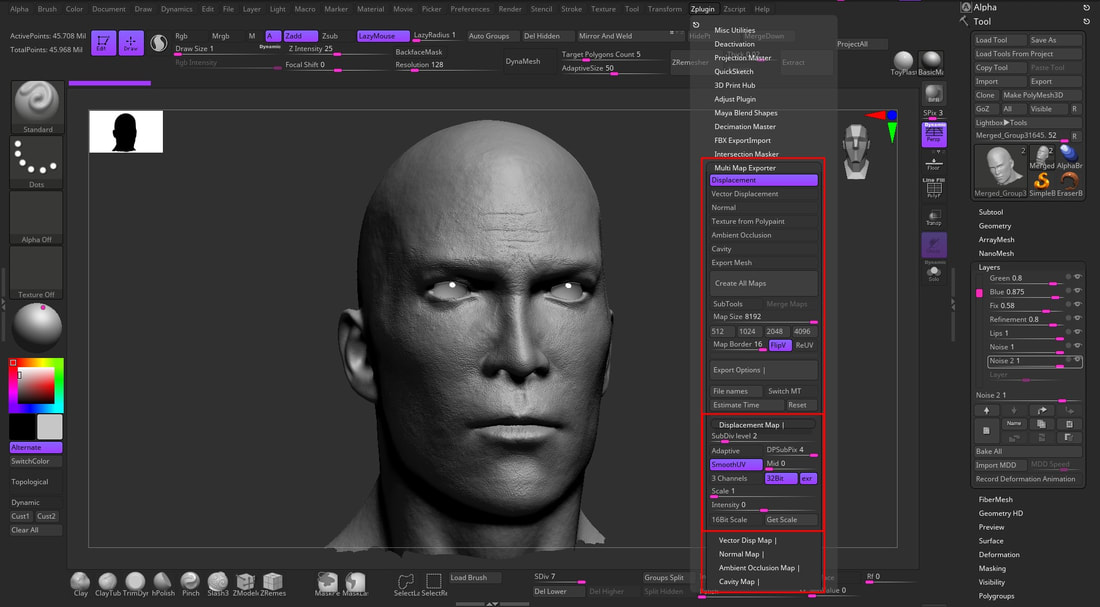
Multi Map Exporter Displacement Settings
Evaluation
This is the Final Result:
I understand it looks too strong and rough, but I wanted to try out the Texturing XYZ maps and the workflow. I'm really impressed with the results and for a first try it was fun. I know what things to look out for. Couple things I noticed I need to practice is the scale of the pores. Some areas vary with the amount of pores and they are larger in areas too so understanding the scale of skin is a main factor to create a realistic character. Without it, it will just look like there was no effort put into the detailing and looks all over the place. I need to look at reference of human skin and what other people do in order to create realistic skin. There are many interesting tutorials and blogs on the Texturing XYZ website so I can look into those. I enjoyed the whole process, from learning Mari, to using layers and morph targets. Since I'll be doing this in Unit 13, I will spend more time on projecting the skin and tweaking it to look as good as possible. My goal as a character artist is to create amazing characters for Games, TV and Film. I don't want this section of my study to make people assume that all I care about is hyperrealism. I prefer to make realistic characters, but I want to be able to create all sorts of things. As an artist that's what I should be to adapt to different things. Right now I believe I'm a good character artist because of the knowledge of software and how to use them, which is a bad thing. I want to be a good character artist not only because of my knowledge of software, but because I create characters artistically. That may not make sense, but I want to be known and feel like an artist. I work everyday to reach that goal and I firmly believe that I can get to where I want to be.
I understand it looks too strong and rough, but I wanted to try out the Texturing XYZ maps and the workflow. I'm really impressed with the results and for a first try it was fun. I know what things to look out for. Couple things I noticed I need to practice is the scale of the pores. Some areas vary with the amount of pores and they are larger in areas too so understanding the scale of skin is a main factor to create a realistic character. Without it, it will just look like there was no effort put into the detailing and looks all over the place. I need to look at reference of human skin and what other people do in order to create realistic skin. There are many interesting tutorials and blogs on the Texturing XYZ website so I can look into those. I enjoyed the whole process, from learning Mari, to using layers and morph targets. Since I'll be doing this in Unit 13, I will spend more time on projecting the skin and tweaking it to look as good as possible. My goal as a character artist is to create amazing characters for Games, TV and Film. I don't want this section of my study to make people assume that all I care about is hyperrealism. I prefer to make realistic characters, but I want to be able to create all sorts of things. As an artist that's what I should be to adapt to different things. Right now I believe I'm a good character artist because of the knowledge of software and how to use them, which is a bad thing. I want to be a good character artist not only because of my knowledge of software, but because I create characters artistically. That may not make sense, but I want to be known and feel like an artist. I work everyday to reach that goal and I firmly believe that I can get to where I want to be.
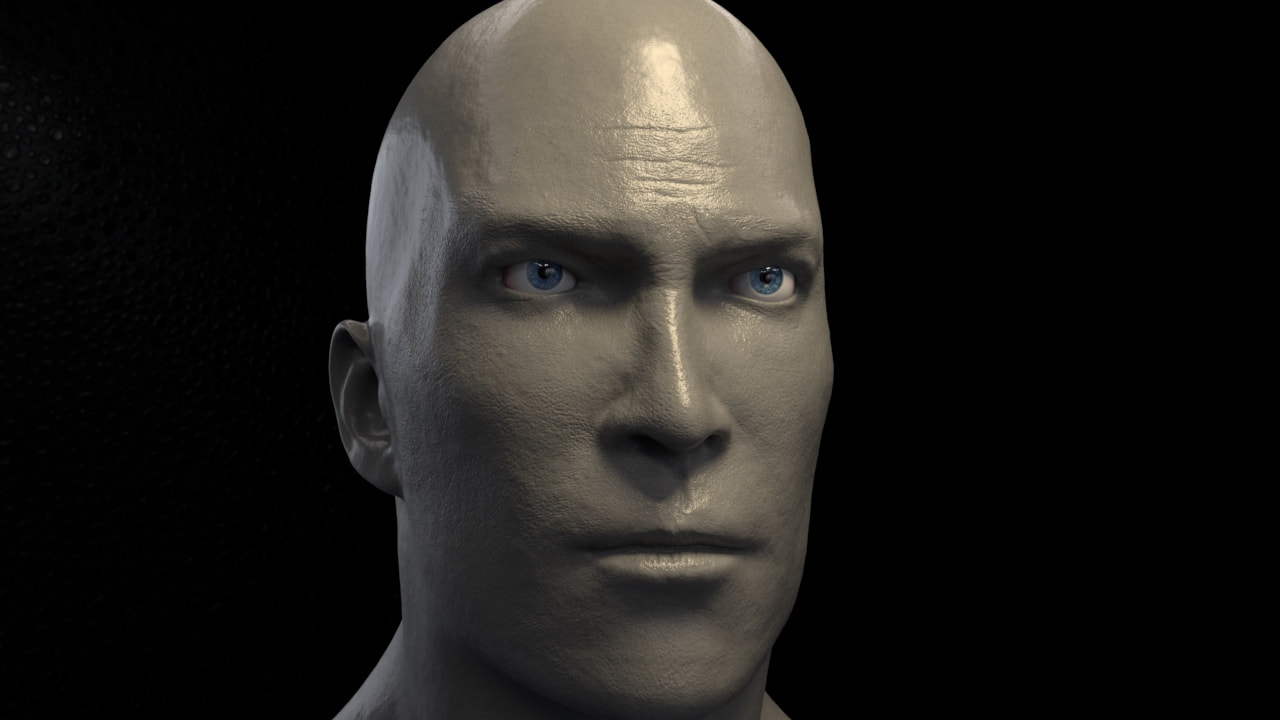
Final Render In Arnold
Bibliography
- Kit, S., 2021. Skin Starter Kit. [online] Texturing.xyz. Available at: <https://texturing.xyz/collections/multi-channel-faces/products/skin-starter-kit> [Accessed 20 February 2021].
- Thanos, B., 2021. Bundle Thanos. [online] Texturing.xyz. Available at: <https://texturing.xyz/collections/human/products/bundle-thanos-the-avengers> [Accessed 10 February 2021].
- Texturing. XYZ. 2021. About Us. [online] Available at: <https://texturing.xyz/pages/about-us> [Accessed 1 February 2021].
